Developing Terminal Based Video Games For Linux
2024-02-29 - By Robert Elder
In this article I'll be exploring the topic of 'terminal-based video game development'. Specifically, I will focus on showing basic proof of concept demos that illustrate how to accomplish various input and output tasks in the terminal that are particularly important for a highly responsive application like a video game.
If you've ever used terminal applications like text editors or monitoring programs and wondered how exactly these programs are able to provide a seemingly graphical interface in the terminal, then you'll enjoy this article. This article will provide code examples and demonstrations for things like terminal mouse support, keyboard events, colored text and many other aspects of terminal interaction that you've probably never even heard of before.
- Determining Terminal Width
- Character Widths
- ANSI Escape Sequences
- Important tty Flags
- Key Up & Key Down Events
- Keyboard Auto-Repeating
- Character Display Limitations & Encodings
- Terminal Mouse Events
- Ncurses
Determining Terminal Width
The first thing you'll need is some way to figure out the dimensions of the terminal. You can use the 'tput' command to give you the current width of the terminal:
tput cols
61
and for the height you can specify 'lines' instead of 'cols':
tput lines
16
From the above output, you can see that my terminal is currently 61 columns wide and 16 lines tall.
To show an example of how you could use this, here is the following nested for loop that simply iterates over every cell in the terminal:
for i in $(seq 1 $(tput lines)); do
 for j in $(seq 1 $(tput cols)); do
  if [ $i -eq 1 -o $j -eq 1 ]; then printf "+"; else printf "-"; fi
 done
done
And the output looks something like the following, which you could describe as the startings of a basic 'game area':
++++++++++++++++++++++++++++++++++++++++++++++++++++++++++++++++++++++++++++++++
+-------------------------------------------------------------------------------
+-------------------------------------------------------------------------------
+-------------------------------------------------------------------------------
+-------------------------------------------------------------------------------
+-------------------------------------------------------------------------------
+-------------------------------------------------------------------------------
+-------------------------------------------------------------------------------
+-------------------------------------------------------------------------------
+-------------------------------------------------------------------------------
+-------------------------------------------------------------------------------
+-------------------------------------------------------------------------------
+-------------------------------------------------------------------------------
+-------------------------------------------------------------------------------
+-------------------------------------------------------------------------------
+-------------------------------------------------------------------------------
+-------------------------------------------------------------------------------
+-------------------------------------------------------------------------------
+-------------------------------------------------------------------------------
+-------------------------------------------------------------------------------
+-------------------------------------------------------------------------------
+-------------------------------------------------------------------------------
+-------------------------------------------------------------------------------
+-------------------------------------------------------------------------------
In the above output, you can see a border on the top and on the left. There is no border on the bottom or the right hand side, but it's not hard to see how you could add this by updating the if condition. The man page for the tput command is worth reading, since 'tput' also allows you to do a number of other terminal related operations:
man tput
For example, if I start out typing down near the bottom of the terminal, I can run this 'tput' command to move my cursor immediately move up to position 10, 30:
tput cup 10 30
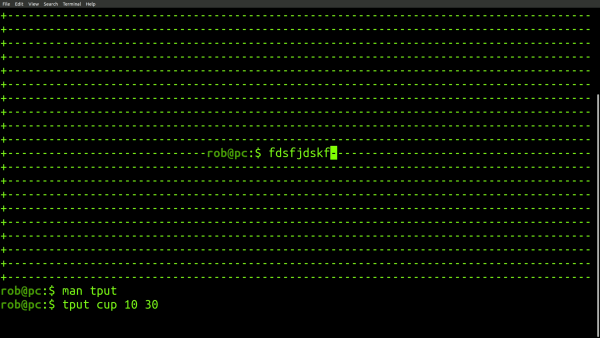
This and other features of the 'tput' command will give you an idea of what's actually possible in the terminal.
Now, let's talk about terminal size changes: The nested 'for' loop that we used previously iterates over the current dimensions of the terminal:
for i in $(seq 1 $(tput lines)); do
 for j in $(seq 1 $(tput cols)); do
  if [ $i -eq 1 -o $j -eq 1 ]; then printf "+"; else printf "-"; fi
 done
done
and from the output seen previously, you can observe that my border was aligned for the current terminal width, however if I change the dimensions of the terminal you can see that my border is totally broken:
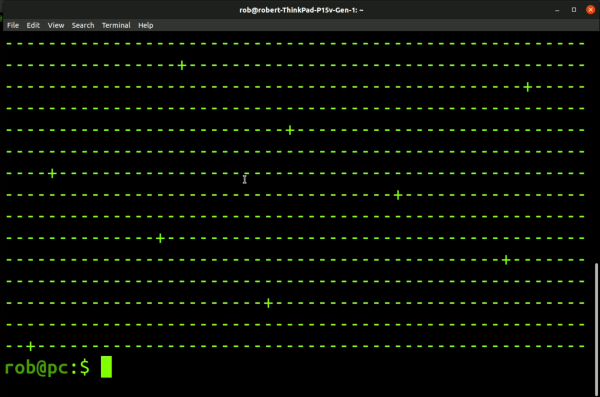
This is predictable because the dimensions of the terminal have changed. What I really need is to be able to hook into some kind of event that actually notifies me when the terminal size changes, and that's exactly what this script does:
import time
import signal
import sys
import os

def get_position(sig, frame):
    sys.stdout.write(
        "Got SIGWINCH, new dimensions are width=" +
        os.popen("tput cols").read().strip() +
        ", height=" +
        os.popen("tput lines").read().strip() + "\n"
    )

signal.signal(signal.SIGWINCH, get_position)

while True:
    time.sleep(1)
python3 detect-terminal-dimension-change.py
The key ingredient is hooking into the SIGWINCH signal. If I run the above script and resize the terminal, you can see that it prints out the new dimensions. If I keep resizing it it keeps printing out the new updated dimensions. By hooking into this event, you can just reprint the screen whenever there's a change in the window size.
Character Widths
Not all characters are equal width. Most ASCII characters take up only one space with the exception of things like tabs, vertical tab, or new line characters. However, many Unicode characters take up more than that. Therefore, you have to do a bit more work to accurately find out how wide a character is.
This was a problem that I first became aware of when writing a terminal based diff tool. The original goal was to have a single file python script that could work cross-platform. The idea was to make it work both on Windows and on Linux. I put a lot of work into finding utility functions to try and accurately calculate the width of characters. I did have some success for certain languages, but I never found any utility functions that would accurately calculate width for all Unicode code points.
To illustrate how hard this problem is to solve, let's look at this example echo statement:
echo -e "®®®®®®®®®®®®®®®®®®®®®®®\n"\
"®---------------------®\n"\
"®---------------------®\n"\
"®®®®®®®®®®®®®®®®®®®®®®®\n"
This 'echo' statement simply prints out a bunch of 'R' symbols, and here you can see a well formatted closed box:

If I go into my terminal settings, preferences/compatibility and I change this setting for ambiguous width characters from narrow to wide:

and run this echo statement again:

You can see that the formatting of the box is totally broken. Clearly, the exact same piece of text can have different width depending on terminal settings. This is something that you have no control over as a programmer.
If you want to dig a bit further into the ultimate source of truth on this topic, you can look into the source code for VTE, which is used by gnome terminal. Specifically, you can check out the _vte_unichar_width function:
/* Returns the width of the given printable Unicode character.
 * For non-printable (control) characters the return value is undefined. */
static int (_vte_unichar_width)(gunichar c, int utf8_ambiguous_width)
{
        vte_assert_cmpuint(c, <=, 0x10FFFFU);

        /* TODO bump to 0x0300 when ambiguous width support is removed */
        if (c < 0x0080) [[likely]] {
                return 1;
        }
        uint8_t x = _vte_width_maj_table[c / 256];
        if (x >= 252) {
                x -= 252;
        } else {
                x = (_vte_width_min_table[x][c % 256 / 4] >> (6 - (c % 4) * 2)) & 0x03;
        }
        if (x == 3)
                x = utf8_ambiguous_width;
        return x;
}
As you can see in the original source linked above, this file is over 11,000 lines long, and the exact code here for determining a character width is fairly complicated. From the comment in this source, it even looks as though it's subject to change. If you check the original source file, you can see that there's a massive table with a whole bunch of hard-coded widths. Also, bear in mind that this is just one individual implementation of a terminal emulator, so it should be clear by now how potentially non-portable these widths are.
A fairly accurate way to calculate character widths would be to hook directly into the '_vte_unichar_width' function in your own code, but that would only be guaranteed to work perfectly for a terminal that used that specific version of the VTE source code. The most authoritative way to get the widths would be to just empirically measure them. Generally speaking, this probably wouldn't be practical but we can consider it for this discussion.
Here, I've written a short python demo specifically for the purpose of comparing these character widths (Updated on 2024-06-23 to fix several issues with unicode control characters and improve debuggability):
import os
import sys
import select
import curses
import signal
import termios
import time

stdscr = curses.initscr()
curses.raw()

#  Save the results to a file:
results_file_name = "/tmp/chr_pos_results.txt"
results_file = open(results_file_name, "wb")
#status_file = open("/tmp/status.txt", "wb")  # For debugging

sys.stdout.write("\x1b[s");  # Save cusor position
sys.stdout.flush()

num_tests = 300
starting_code_point = 0

for i in range (starting_code_point, num_tests + starting_code_point):
    codepoint = i
    current_character = chr(codepoint)
    if codepoint >= 128 and codepoint <= 159: # U+0080 to U+009F
        # Skip unicode control characters because some of them
        # like U+0090 will get stuck waiting for more input:
        results_file.write(("Skip codepoint=" + str(codepoint) + " due to control sequence.\n").encode("utf-8"))
        continue
    try:
        current_character.encode("utf-8")  #  Some individual code points like surrogate pairs can't be encoded.
    except:
        results_file.write(("Skip codepoint=" + str(codepoint) + " due to encoding issue.\n").encode("utf-8"))
        continue  # Skip this one.
    sys.stdout.write("\x1b[1;1H");  # Set cursor position to a fixed location.
    sys.stdout.flush()  # Make sure cursor is re-positioned.
    sys.stdout.write(current_character)
    sys.stdout.flush()  # Make sure character is printed to the screen
    sys.stdout.write("\x1b[6n");  # Get cursor position
    sys.stdout.flush()  # Write ANSI code to get cursor pos
    #print("the char is " + current_character)
    results_file.write(("Pos for '" + current_character + "', codepoint=" + str(codepoint) + ": ").encode("utf-8"))
    current_result = ""
    #status_file.write(("wrote data=" + str(current_character.encode("utf-8")) + " to terminal.\n").encode("utf-8"))
    while True:
        #status_file.write(("Before if, codepoint=" + str(codepoint) + " current_result=" + str(current_result.replace("\033","")) + "\n").encode("utf-8"))
        if select.select([sys.stdin.fileno(), ], [], [], 0.0)[0]:
            #status_file.write(("Before read, codepoint=" + str(codepoint) + " current_result=" + str(current_result.replace("\033","")) + "\n").encode("utf-8"))
            data = os.read(sys.stdin.fileno(), 1)
            #status_file.write(("After read, codepoint=" + str(codepoint) + " current_result=" + str(current_result.replace("\033","")) + "\n").encode("utf-8"))
            #print("Got '" + str(data) + "'.")
            results_file.write(data)
            current_result += data.decode("utf-8")
        else:
            if current_result.endswith("R"):  #  Look for ending symbol in position response.
                break
        #status_file.write(("After if, codepoint=" + str(codepoint) + " current_result=" + str(current_result.replace("\033","")) + "\n").encode("utf-8"))
    results_file.write("\n".encode("utf-8"))


sys.stdout.write("\x1b[u");  # Restore cusor position
sys.stdout.flush()
sys.stdout.write("Exiting, restoring terminal...Inspect '" + results_file_name + "' to see results.\n");
curses.noraw()
curses.endwin()
The script starts by iterating through the first 300 Unicode code points. For each code point, it outputs an ANSI escape sequence to set the cursor to a specific position. Then, after the character has been printed, another ANSI escape sequence is issued. This second escape sequence allows us to read back the current cursor position. And finally, the measurement results are written to a file for later inspection.
To run the script, I can use this command:
python3 character-width-check.py
The results file at '/tmp/chr_pos_results.txt' is now full of entries like this:
...
Pos for '<', codepoint=60: ^[[1;2R
Pos for '=', codepoint=61: ^[[1;2R
Pos for '>', codepoint=62: ^[[1;2R
Pos for '?', codepoint=63: ^[[1;2R
Pos for '@', codepoint=64: ^[[1;2R
Pos for 'A', codepoint=65: ^[[1;2R
Pos for 'B', codepoint=66: ^[[1;2R
Pos for 'C', codepoint=67: ^[[1;2R
...
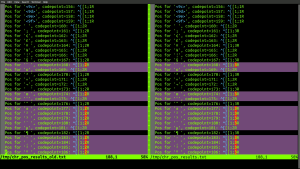
The '[[1;2R' parts here shows us what the returned cursor position values were. By subtracting away the initial character position, these values can be used to calculate the character widths. Next, I'll move this file to '/tmp/chr_pos_results.txt' and change my terminal preferences again to set the character compatibility back to wide. Then, I'll run the script again, and use Vim to compare the the results:
As you can see here, this comparison shows us which characters had a different value returned for their updated cursor positions between the 'wide' and 'narrow' terminal character width setting.
In the script that we just ran, there were a couple special ANSI escape sequences, and that's a perfect segue into our next topic which is ANSI escape codes.
ANSI Escape Sequences
There are a lot of different ANSI escape sequences that do special things, but I think the best place to start is by showing how you can print colored text with these codes:
echo -e "\033[31;42mHello World.\033[0m"
This piece of text might look a bit scary to read at first. The '\033' part here is one single escaped character. The leading zero lets us know it's an octal notation. You'll often see people write this in hexadecimal notation too but it's really just the same thing:
echo -e "\x1b[31;42mHello World.\033[0m"
Whenever the terminal sees these two special characters (\x1b followed by [), it will interpret the next few characters as a series of control sequence introducers. In this case, it prints colored text. If you want to see the same thing in heximal notation here it is:
echo -e "\033[31;42mHello World.\033[0m" | xxd
00000000: 1b5b 3331 3b34 326d 4865 6c6c 6f20 576f  .[31;42mHello Wo
00000010: 726c 642e 1b5b 306d 0a                   rld..[0m.
In this case the '31' means a foreground color that's red, and the '42' means a background color that's green. It's worth noting that you can swap the order of these numbers:
echo -e "\033[42;31mHello World.\033[0m"
And if you change these numbers you can get different colors:
echo -e "\033[42;32mHello World.\033[0m"
echo -e "\033[42;33mHello World.\033[0m"
echo -e "\033[42;34mHello World.\033[0m"

The color attributes can be turned off with a control sequence that ends in '0m'. A common mistake is to forget to include this shut off sequence which results in everything that follows being colored using the most recent set of color attributes:
echo -e "\033[42;31mHello World.\033[0m"
date
uptime
echo -e "\033[42;31mHello World."
date
uptime
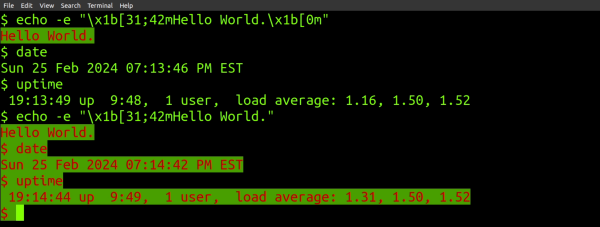
If you want to see even more examples of the colors and styles you can run a for loop like this:
for i in {0..40}; do
 for j in {0..5}; do
  echo -en "$(printf '%3s' ${i}),$(printf '%-3s' ${j}:) \033[${i};$(($i*5+$j))mHello World"'!'"\033[0m ";
 done;
 echo -en "\n";
done
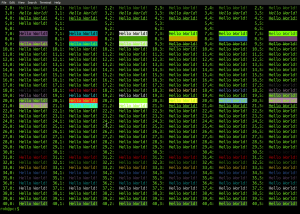
The output will look something like the following image:
As you can see, there's all sorts of options for underlining text, putting a line through it, or making the text blink.
ANSI sequences are not just for printing colored text. There's also a number of special control operations that they can perform as well. For example, when I run a command to open Vim and then later decide to close Vim, you can observe how any text that was on the screen before Vim was started is still on the terminal. This is true even though it looks like it was overwritten by Vim. You might be wondering how to accomplish the same thing well. The answer is an ANSI escape code:
echo -e "\033[?1049h"
The escape code that we just ran has activated the alternate screen buffer. While the 'alternate screen buffer' is active, it will look like all the information on the previous screen is gone, but we can still return to it. This escape code will let us return from the alternate screen buffer:
echo -e "\033[?1049l"
Note that the only difference with this escape code is the 'h' has been replaced by an 'l'.
If you go back to the previous script that I ran, you can see that there are even more ANSI escape sequences that I haven't talked about, such as this one to save the current cursor position:
sys.stdout.write("\x1b[1;1H"); # Set cursor position to a fixed location.
and this one to restore the current cursor position:
sys.stdout.write("\x1b[u"); # Restore cusor position
Most of the color-based ANSI escape sequences are well supported, but not all ANSI escape sequences will work in all terminals. Read more about ANSI Escape codes here.
Important tty Flags
The next important topic to discuss is to show how you can prevent input characters from being echoed back onto the terminal. For example, if I run the 'date' command and then the 'uptime' command, the characters that I type are echoed back onto the terminal in real time. It's a common requirement for many applications to prevent this behavior. For this, you can use the 'stty' command with '-echo':
stty -echo
If I type the 'date' or 'uptime' command again, you can see that the commands that I type are not echoed onto the terminal anymore. You can re-enable echoing by running 'stty echo' (but you won't be able to see what you're typing):
stty echo
One example of an application that you've probably used before that disables echoing is the 'top' command:
top
Within the top application, I can press various keys to change the sort order. However, the keys that I press don't show up on the terminal.
To better illustrate the usefulness of disabling character echoing, I've written a simple example script:
import os
import sys
import termios

#  Disable the line-based input buffering:
new = termios.tcgetattr(sys.stdin.fileno())
new[3] &= ~termios.ICANON
termios.tcsetattr(sys.stdin.fileno(), termios.TCSAFLUSH, new)


while True:
    data = os.read(sys.stdin.fileno(), 1)
    for d in data:
        to_write = chr(d+1)
        sys.stdout.write(to_write)
        sys.stdout.flush()
The script starts by disabling line-based input buffering. This way, I can capture the input one character at a time. For each input character that I type the script increments the character value by one and then prints it. If I run the script like this:
python3 noecho-problem-demo.py
And then press the 'f' key, you can see that it's printing the letter that comes after 'f' just as you'd expect. However, in addition to echoing back the 'g' characters it's still echoing back the original characters that I input which is something that I want to avoid:
fgfgfgfgfgfgfgfgfgfgf
As we just learned, this problem can be solved by disabling character echoing, and most importantly re-enabling it upon program exit:
import os
import sys
import termios
import curses

stdscr = curses.initscr()
curses.noecho()

#  Disable the line-based input buffering:
new = termios.tcgetattr(sys.stdin.fileno())
new[3] &= ~termios.ICANON
termios.tcsetattr(sys.stdin.fileno(), termios.TCSAFLUSH, new)


while True:
    data = os.read(sys.stdin.fileno(), 1)
    for d in data:
        to_write = chr(d+1)
        sys.stdout.write(to_write)
        sys.stdout.flush()

curses.echo()
curses.endwin()
python3 noecho-demo.py
If I run this program with 'echo' disabled, and again press the 'f' key you can see that it does just as you'd expect:
ggggggggggggggggggg
It takes every character that I input, increments it by one and then outputs only that character. Another feature of terminal interaction that you might be curious about is how control characters are handled. For example, if I open Vim and then press CTRL + C, the Vim program doesn't immediately exit. However, you're probably aware that CTRL + C will usually exit immediately from a program. You might be wondering how you can override control characters like CTRL + C in your program. The answer is to use raw terminal mode. As this example illustrates, here you can see that we're enabling raw mode as soon as the program starts:
import os
import sys
import curses

stdscr = curses.initscr()
curses.raw()

while True:
    data = os.read(sys.stdin.fileno(), 1)
    sys.stdout.write("Got input: '" + str(data) + "'.\n\r")

curses.noraw()
curses.endwin()
If I run the demo like this:
python3 raw-mode-demo.py
and type some characters, you can see that each of the characters is echoed to the screen:
Got input: 'b'a''.
Got input: 'b's''.
Got input: 'b'd''.
Got input: 'b'f''.
If I press contrl C or even contrl D or contrl Z, none of these control characters will invoke their usual special behavior:
Got input: 'b'\x03''.
Got input: 'b'\x04''.
Got input: 'b'\x1a''.
In fact there is nothing that I can do to escape this program now. The only solution is to close the terminal.
By overidding the default behavior of these control keys, this allows your program to do something special with them. The most common use case for this feature is to begin some sort of graceful shutdown process. In the case of Vim, this is most likely done to prevent the user from discarding pending changes in the current file.
You can check out the man page for the 'stty' command for all kinds of different flags that you can enable or disable related to the terminal:
man stty
...
       raw    same  as -ignbrk -brkint -ignpar -parmrk -inpck -istrip -inlcr -igncr -icrnl -ixon -ixoff -icanon -opost
              -isig -iuclc -ixany -imaxbel -xcase min 1 time 0

       -raw   same as cooked

       sane   same as cread -ignbrk brkint -inlcr -igncr icrnl icanon iexten echo echoe echok -echonl  -noflsh  -ixoff
              -iutf8 -iuclc -ixany imaxbel -xcase -olcuc -ocrnl opost -ofill onlcr -onocr -onlret nl0 cr0 tab0 bs0 vt0
              ff0 isig -tostop -ofdel -echoprt echoctl echoke -extproc -flusho, all special characters  to  their  de‐
              fault values
...
Another important aspect of terminal input and output that we touched upon is line buffering. If you want to do input or output with individual characters then line buffering is something you have to be very careful of. If line buffering is enabled, you may not be able to read individual characters from standard input or write them to standard output until a new line is encountered. For more information on this topic see the 'stdbuf' command.
Key Up & Key Down Events
This example shows the simplest possible way to obtain key up or key down events in a terminal:
#  At least one of these should work with python2:
#    sudo pip install keyboard
#    sudo pip2 install keyboard
#  This should work with python3:
#    sudo pip3 install keyboard

import pygame
import time

pygame.init()
d = pygame.display.set_mode((800,600))
d.fill((255,255,255))

done = False
while not done:
  for event in pygame.event.get():
    if event.type == pygame.QUIT:
      done = True
    if event.type == pygame.KEYUP:
      print("Got keyup event: " + str(event))
    if event.type == pygame.KEYDOWN:
      print("Got keydown event: " + str(event))

pygame.quit()
quit()
If I run the script like this:
python3 simplest-keyup-keydown.py
and press the 'f' key down and hold it down, followed by releasing it, you can see that this gives me accurate key up and key down events:
Got keydown event: <Event(768-KeyDown {'unicode': 'f', 'key': 102, 'mod': 0, 'scancode': 9, 'window': None})>
Got keyup event: <Event(769-KeyUp {'unicode': 'f', 'key': 102, 'mod': 0, 'scancode': 9, 'window': None})>
However, if I copy the script to a headless server and try to run it again, it doesn't work. This is an important point to understand about terminals. A terminal has no concept of key up or key down events. In fact, it doesn't know anything about keyboards at all. This is a topic that I've explored in significant detail in Why Is It so Hard to Detect Keyup Event on Linux?. In this blog post I have a number of different examples that show how you can detect keyup events in a variety of different situations. Many of these solutions have trade-offs, so you'll have to think about what works best for your situation.
Realistically, it makes sense that key up events don't work over an SSH connection to a headless server. Unless you're using X forwarding, an SSH connection doesn't know anything about your keyboard. In general there's also security considerations about listening to all keyboard events if a low privileged terminal application running in the background can listen to all keyboard events that basically gives you a key logger.
Keyboard Auto-Repeating
If I press the 'f' key and hold it down, you'll notice that it types one character instantly and then delays for a while. Then, after the delay characters start outputting rapidly. This behavior is called 'keyboard autorepeating' and you can change this behavior with the 'xset' command. If I run this command:
xset r rate 1 100
and then press the 'f' key, you can see that there's minimal initial delay now. Also, the characters type much faster. In fact, my terminal is barely usable now. If I try to type "Hello World" as carefully as possible, this is what I get:
hhhhhhhheeeeeeeelllllllllllllllllllooooooooo wwwwwwwwwooooooooorrrrrrrrrrrlllllllllllddddddddd
That's the best I can do. In fact, if you try this you'll need a reset command that you can copy paste so you can reset your terminal back to normal:
xset r rate 500 30
In this command the first value (500) provides the initial delay before autorepeating kicks in and the second value (30) provides the character repeat rate. As its name suggests the 'xset' command only works within the context of an X server. You can use 'xset q' to show useful debug information about the current settings of your input:
xset q
Keyboard Control:
  auto repeat:  on    key click percent:  0    LED mask:  00000000
  XKB indicators:
    00: Caps Lock:   off    01: Num Lock:    off    02: Scroll Lock: off
    03: Compose:     off    04: Kana:        off    05: Sleep:       off
    06: Suspend:     off    07: Mute:        off    08: Misc:        off
    09: Mail:        off    10: Charging:    off    11: Shift Lock:  off
    12: Group 2:     off    13: Mouse Keys:  off
  auto repeat delay:  500    repeat rate:  30
  auto repeating keys:  00ffffffdffffbbf
                        fadfffefffedffff
                        9fffffffffffffff
                        fff7ffffffffffff
  bell percent:  50    bell pitch:  400    bell duration:  100
Pointer Control:
  acceleration:  2/1    threshold:  4
Screen Saver:
  prefer blanking:  yes    allow exposures:  yes
  timeout:  0    cycle:  0
Colors:
  default colormap:  0x20    BlackPixel:  0x0    WhitePixel:  0xffffff
Font Path:
  /usr/share/fonts/X11/misc,/usr/share/fonts/X11/Type1,built-ins
DPMS (Energy Star):
  Standby: 0    Suspend: 0    Off: 0
  DPMS is Enabled
  Monitor is On
As I described, the 'xset' command only works for a graphical environment so that leaves the question: How do you change the keyboard autorepeat rate if you're not in a graphical environment? For the next part of this discussion, I'll be switching to the Linux console and to do that I'll use Control Alt F3.
Ok, now that we're on the Linux console, let's try to run the X set command here:
xset r rate 1 100
Unsurprisingly, it doesn't work, and produces only the following output:
xset: unable to open display ""
Instead, we can use the 'kbdrate' command on the console:
sudo kbdrate -r 30 -d 1000
Now, when I try pressing and holding the 'f' key, you can see that the delay is now much greater.
I'll use this command to set it back to something more reasonable:
sudo kbdrate -r 10.9 -d 250
Character Display Limitations & Encodings
To finish up the discussion from the last section about the Linux console, let's talk about another problem that you might encounter in a primitive terminal environment, and that problem is displaying unicode characters. Let's try to print the following script that contains Japanese characters in a Linux console environment:
cat locale-demo.sh

as you can see, the characters don't display properly. Within the context of a Linux Console, I can use another terminal tool that will allow me to display these characters:
fbterm
cat locale-demo.sh

As you can see, the characters are now rendered properly.
Another very confusing issue to debug with malformed characters (in a windowed environment) is related to language or encoding settings. In particular, let's look at an example that involves the LC_CTYPE variable:
echo "LC_CTYPE has value '${LC_CTYPE}'."
As you can see its current value is empty:
LC_CTYPE has value ''.
If I open the script in Vim, I can see the following Japanese characters rendered clearly:
vi locale-demo.sh
However, if I change the LC_CTYPE variable to this:
export LC_CTYPE=en_US.iso88591
echo "LC_CTYPE has value '${LC_CTYPE}'."
LC_CTYPE has value 'en_US.iso88591'.
vi locale-demo.sh
and open the file again, you can see that the characters are not rendered properly:
In this situation the LC_CTYPE variable gives incorrect information to the Vim program. Vim will then attempt to display these utf8 characters as ISO 88591 characters. If we change the LC_CTYPE variable back to nothing the file is once again rendered properly:
export LC_CTYPE=''
The LC_CTYPE variable is just one of many language related variables. There's also LANG, LC_ALL and LC_COLLATE.
Let's take a look at another character rendering issue that's not related to variables but terminal encodings instead. Once again, here's the output from our script which renders properly:
cat locale-demo.sh

However, if I change the terminal character encoding from utf8 to a legacy Chinese encoding:
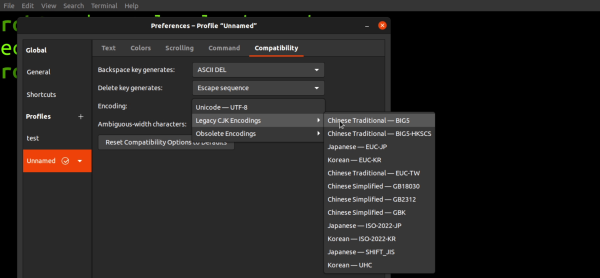
and then output the same script again, you can see that it doesn't render properly:

If I open this file in Vim you can see that it still doesn't render properly:
If I change the encoding back to utf8 the characters now render properly again.
We can also see what happens if we make a copy of the script and in the process convert it from utf8 to utf16:
iconv -t UTF-16 -f UTF-8 locale-demo.sh > locale-demo-UTF-16.sh
If I try to print this script to the terminal you can see that it doesn't render properly:

However if I open this file in Vim, you can see that it's rendered properly even though it doesn't output clearly on the terminal.
This is because Vim is able to recognize the different encoding of the file. Vim automatically converts the file from native utf16 and displays it in our terminal in utf8. Note that in the bottom it says 'converted'.

Terminal Mouse Events
Now let's talk about terminal support for mouse events. If I run the following ANSI escape sequence in the terminal like this:
echo -e "\033[?1003h"
I'll see a whole bunch of output every time I move the mouse cursor:
Ck,Cj,Cj+Cj+Cj+Cj+Cj+Cj+Cj+Cj+Cj+Cj+Cj+Cj+Cj+Cj+Ci+Ci+Ci+Ci+Ci+Ci+Ci+Ci+C
i+Ci+Ci*Ci*Ci*Ci*Ci*Ci*Ch*Ch*Ch*Ch*Ch*Ch*Ch*Cg*Ce)Cd)Cd)Cd)Cc)Cc)Ca)Ca)C`
)C`)C`(C_(C^(C^(C^(C^(C^(C](C[(C[(C[(C[)C[)C[)C[)CZ)CZ)CZ)CZ)CZ)CZ)CZ)CZ)
CZ)CY)CY*CY*CY*CY*CY*CY*CY*CX+CX+CX+CX+CX,CX,CX,CW,CW,CW,CW-CW-CW-CW-CW-C
W-CW.CW.CW.CW/CW/CW/CW/CW/CV/CV/CV0CV0CV0CV0CV0CV0CV0CV0CV0CV0CV0CV0CV0CV
0CV0CV0CV0CV0CV0CV0CT1CT1CS1CS1CS1CR1CR1CR1CQ1CQ1CN1CL2CL2CL2CL2CK2CK2CK2
CK2CK1CK1CK1CK1CK1CK1CK/CJ/CJ/CJ/CJ.CJ.CJ-CJ-CI-CI,CI,CI+CH+CH+CH*CG*CG)C
F)CF(CF(CF(CE(CE'CD'CD'CD'CD'CD'CD'CD'CD'CC'CC'CB'C>)C>)C=*C<*C<*C:+C9+C9
+C8,C8,C7,C7,C6-C6-C5-C5-C4-C4.C4.C4.C3.C4.C4.C4.C4.C4.C4.C5.C5.C5.C6.C6.
C8.CC-CD-CF-CG-CK-CN-CP-CQ-CS-CT-CV-CW-CZ-C[-C\-C]-Cb-Cc-Cd-Ce-Ce-Cf-Cf-C
f-Cf-Cf.Cf.Ce.Ce.Ce.Ce.Cd.Cd.Cd.Cc.Cb.Ca.C_.C^.C].C\.C\.C[.CZ.CX.CX-CW-CW
-CW-CW-CW-CX-CX-CX,CX,CY,CY,CY,CY,CZ+CZ+CZ+CZ+C\*C\*C]*C])C])C])C])C])C])
C])C^)C^)C^)C])C])C])C])C]*C]*C]*C]*C]*C]*C]+C]+C^+C^+C_-C_-C_-C_.C_.C`.C
`.C`/C`/Ca/Cb1Cb1Cb1Cb1Cc1Cc1Cc1Cc1Cc1Cc1Cc1Cc1Cc1Cc1Cc1Cc1Cc1Cc1Cc1Cc0Cc
0Cd/Cd/Cd.Cd.Cd.Cd-Cd-Cd-Cc,Cc,Cb*Ca)Ca)Ca)C`(C`(C_(C_'C_'C^&CZ$CZ$CZ$CZ$
CZ$CZ$CZ$CZ$CZ$CZ$CZ$CY$CY$CY$CY$CY%CY%CY%CX%CX&CX'CW'CW(CW(CW(CW(CW(CW)C
W)CW)CW*CX+CX+CX+CX+CX+CY+CY,CY,C[,C[-C\-C\-C\-C]-C]-C]-C]-C^-Ca.Ca.Ca.Cb
.Cb.Cc.Cc.Cc-Cd-Cf-Cf-Cf-Cf-Cf-Cf-Cf-Cf-Cf,C
If I then echo this ANSI escape sequence:
echo -e "\033[?1003l"
The output turns off. The strange looking output above actually contains the information that we need for keeping track of most events.
For the next demo I've leveraged a piece of source code from this web page. In particular, the example shown at the end of the article. In my case, the example code didn't work as provided. I also found that I had to add a call to the 'keypad' function to actually receive mouse events. According to the documentation, this function call turns on keypad translation for input sequences. I also needed to set the mouse interval to avoid missing short mouse clicks. In addition, I also updated the example to add detection for more mouse events and reporting of the mouse position:
/*

This program was successfully compiled using the following commands:
gcc -c terminal-mouse-clicks.c &&
gcc terminal-mouse-clicks.o -o terminal-mouse-clicks -ltinfo -lncurses &&
./terminal-mouse-clicks

*/

#include <ncurses.h>
#include <string.h>

#define WIDTH 30
#define HEIGHT 10

int startx = 0;
int starty = 0;

char *choices[] = {
	"Choice 1",
	"Choice 2",
	"Choice 3",
	"Choice 4",
	"Exit",
};

int n_choices = sizeof(choices) / sizeof(char *);

void print_menu(WINDOW *menu_win, int highlight);
void report_choice(int mouse_x, int mouse_y, int *p_choice);

int main() {
	int c, choice = 0;
	WINDOW *menu_win;
	MEVENT event;

	/* Initialize curses */
	initscr();
	clear();
	noecho();
	cbreak();	//Line buffering disabled. pass on everything

	/* Try to put the window in the middle of screen */
	startx = (80 - WIDTH) / 2;
	starty = (24 - HEIGHT) / 2;

	attron(A_REVERSE);
	mvprintw(28, 1, "Click on Exit to quit (Works best in a virtual console)");
	refresh();
	attroff(A_REVERSE);

	/* Print the menu for the first time */
	menu_win = newwin(HEIGHT, WIDTH, starty, startx);

	//  This makes the mouse click events work:
        keypad(menu_win, TRUE);

	print_menu(menu_win, 1);
	/* Get all the mouse events */
	mousemask(ALL_MOUSE_EVENTS | REPORT_MOUSE_POSITION, NULL);

	/*  This function specifies the minimum number of time between
	    a press and release that will register as a 'click' (in milliseconds)
	*/
	mouseinterval(1);

	printf("\033[?1003h\n");//  Start reporting mouse events

	unsigned int wgetch_call_number = 0;
	unsigned int getmouse_call_number = 0;
	while(1) {
		c = wgetch(menu_win);
		wgetch_call_number++;
		mvprintw(22, 1, "%u) wgetch returned %d. Value of KEY_MOUSE is %d.", wgetch_call_number, c, KEY_MOUSE);
		refresh();
		switch(c){
			case KEY_MOUSE:{
				int getmouse_rtn = getmouse(&event);
				getmouse_call_number++;
				mvprintw(23, 1, "%u) getmouse returned '%d'.  Value of OK is %d\n", getmouse_call_number, getmouse_rtn, OK);
				refresh();
				if(getmouse_rtn == OK) {
					mvprintw(24, 1, "%u) event.bstate mask is '%d'.  Value of OK is %d\n", getmouse_call_number, event.bstate);
					refresh();
					if(
						event.bstate & BUTTON1_RELEASED ||
						event.bstate & BUTTON1_PRESSED ||
						event.bstate & BUTTON1_CLICKED
					) {
						report_choice(event.x + 1, event.y + 1, &choice);
						if(choice == -1) //Exit chosen
							goto end;
						//mvprintw(25, 1, "Choice made is : %d String Chosen is \"%10s\"", choice, choices[choice - 1]);
						refresh();
					}
					if(event.bstate & REPORT_MOUSE_POSITION){
						mvprintw(21, 1, "Mouse move: x=%d, y=%d     ", event.x, event.y);
						refresh();
					}
				}else{
					mvprintw(26, 1, "%u) getmouse_rtn has rtn value '%d'.\n", getmouse_rtn);
				}
				print_menu(menu_win, choice);
				break;
			}
		}
	}
end:
	printf("\033[?1003l\n");//  Stop reporting mouse events

	endwin();
	return 0;
}


void print_menu(WINDOW *menu_win, int highlight) {
	int x, y, i;

	x = 2;
	y = 2;
	box(menu_win, 0, 0);
	for(i = 0; i < n_choices; ++i)
	{	if(highlight == i + 1)
		{	wattron(menu_win, A_REVERSE);
			mvwprintw(menu_win, y, x, "%s", choices[i]);
			wattroff(menu_win, A_REVERSE);
		}
		else
			mvwprintw(menu_win, y, x, "%s", choices[i]);
		++y;
	}
	wrefresh(menu_win);
}

/* Report the choice according to mouse position */
void report_choice(int mouse_x, int mouse_y, int *p_choice) {
	int i,j, choice;

	i = startx + 2;
	j = starty + 3;
	for(choice = 0; choice < n_choices; ++choice)
		if(mouse_y == j + choice && mouse_x >= i && mouse_x <= i + strlen(choices[choice]))
		{	if(choice == n_choices - 1)
				*p_choice = -1;
			else
				*p_choice = choice + 1;
			break;
		}
}
To compile this and put it all together, I use this command:
gcc -c terminal-mouse-clicks.c &&
gcc terminal-mouse-clicks.o -o terminal-mouse-clicks -ltinfo -lncurses &&
./terminal-mouse-clicks
Here is the result:
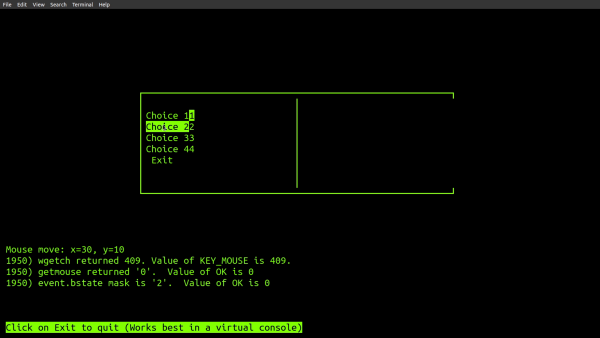
As you can see, this is a fully terminal based program that detects mouse clicks and mouse movements. If you want to see where some of these most events are defined you can check the source code for the ncurses library in 'ncurses/base/lib_mouse.c'. And that's an excellent segue into discussing the ncursus package itself.
Ncurses
If you write applications for the terminal, sooner or later you're bound to come across the ncurses package. If you're ever wondered if a certain feature is even possible in the terminal or not it's worth checking out the test cases for the ncursus package. I believe the ncurses tests are only designed to be run on the specific version of ncurses after it's been installed, however I found you can just run the configure script as if you going to install it:
./configure --prefix=/usr           \
            --mandir=/usr/share/man \
            --with-shared           \
            --without-debug         \
            --without-normal        \
            --with-cxx-shared       \
            --enable-pc-files       \
            --enable-widec          \
            --with-pkg-config-libdir=/usr/lib/pkgconfig
Then, you can simply run 'make':
make
In my case, ncurses is already installed on my machine so I don't want to overwrite the existing version but if I 'cd' to the 'test' directory:
cd test
ls $(find . -type f -executable -print)
./back_ground    ./demo_new_pair   ./firstlast      ./lrtest                        ./savescreen.sh    ./test_opaque
./background     ./demo_panels     ./foldkeys       ./make-tar.sh                   ./sp_tinfo         ./testscanw
./blue           ./demo_tabs       ./form_driver_w  ./move_field                    ./tclock           ./test_setupterm
./bs             ./demo_termcap    ./gdc            ./movewindow                    ./testaddch        ./test_sgr
./cardfile       ./demo_terminfo   ./hanoi          ./ncurses                       ./test_addchstr    ./test_termattrs
./chgat          ./ditto           ./hashtest       ./newdemo                       ./test_addstr      ./test_tparm
./clip_printw    ./dots            ./inchs          ./package/debian-mingw64/rules  ./test_add_wchstr  ./test_unget_wch
./color_content  ./dots_curses     ./inch_wide      ./package/debian-mingw/rules    ./test_addwstr     ./test_vid_puts
./color_set      ./dots_mvcur      ./insdelln       ./package/debian/rules          ./test_arrays      ./test_vidputs
./combine        ./dots_termcap    ./inserts        ./padview                       ./testcurs         ./tput-colorcube
./configure      ./dots_xcurses    ./ins_wide       ./pair_content                  ./test_delwin      ./tput-initc
./demo_altkeys   ./dup_field       ./key_names      ./picsmap                       ./test_getstr      ./tracemunch
./demo_defkey    ./echochar        ./keynames       ./railroad                      ./test_get_wstr    ./view
./demo_forms     ./extended_color  ./knight         ./rain                          ./test_instr       ./worm
./demo_keyok     ./filter          ./list_keys      ./redraw                        ./test_inwstr      ./xmas
./demo_menus     ./firework        ./listused.sh    ./savescreen                    ./test_mouse
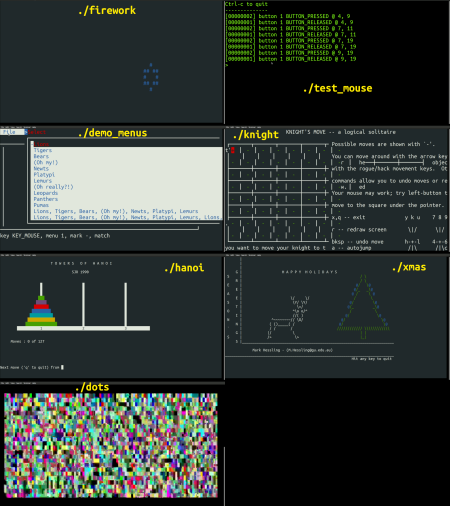
Now, I can see all the tests are available:
Here is the output from a select few of these tests:
./firework
./test_mouse
./demo_menus
./knight
./hanoi
./xmas
./dots
Conclusion
This concludes our review of the most important topics that you need to be aware of for developing terminal based applications like video games. Obviously, there are many more details that could be covered in each section, but there is simply too much to cover for one blog post. Hopefully, this article should give you enough ideas for future research.
 A Surprisingly Common Mistake Involving Wildcards & The Find Command
Published 2020-01-21 |
 Buy Now -> |
 A Guide to Recording 660FPS Video On A $6 Raspberry Pi Camera
Published 2019-08-01 |
 The Most Confusing Grep Mistakes I've Ever Made
Published 2020-11-02 |
 Use The 'tail' Command To Monitor Everything
Published 2021-04-08 |
 An Overview of How to Do Everything with Raspberry Pi Cameras
Published 2019-05-28 |
 An Introduction To Data Science On The Linux Command Line
Published 2019-10-16 |
 Using A Piece Of Paper As A Display Terminal - ed Vs. vim
Published 2020-10-05 |
| Join My Mailing List Privacy Policy |
Why Bother Subscribing?
|
