Pump Room Leak & Temperature Monitoring With Raspberry Pi
2019-06-20 - By Robert Elder
In this guide we'll perform a case study on how to set up your own remote monitoring system to check for leaks or dangerously low temperatures in your basement or pump room. The final solution will be one that is capable of taking pictures (or video) along with temperature and humidity data which can be sent to you regularly by email notifications. We'll discuss how to automatically upload your pictures or video to Amazon's S3 storage service so they can be publicly available and viewed from anywhere. Here's a full bill of materials of what you'd need to create this setup yourself:
- Raspberry Pi 3 Model B ($58.13 CAD)
- SD Card For Raspberry Pi ($10.00 CAD)
- DHT11 Temp & Humidity Sensor ($1.32 CAD)
- DS18B20 Thermal Probe ($3.66 CAD)
- Raspberry Pi Camera ($5.35 CAD)
Total Cost of project: $78.44 CAD. Other items you may or may not already own: USB cable for the Pi; USB wall wart adapter for the Pi; jumper wires to connect DS18B20 to GPIO pins.
For temperature measurements, we'll integrate two different sensors into the project. One of the primary concerns you may have in monitoring your pump room is to make sure the temperature doesn't go below the freezing point of water. Having two temperature readings from different sensors will give redundancy to the measurements in case one fails.
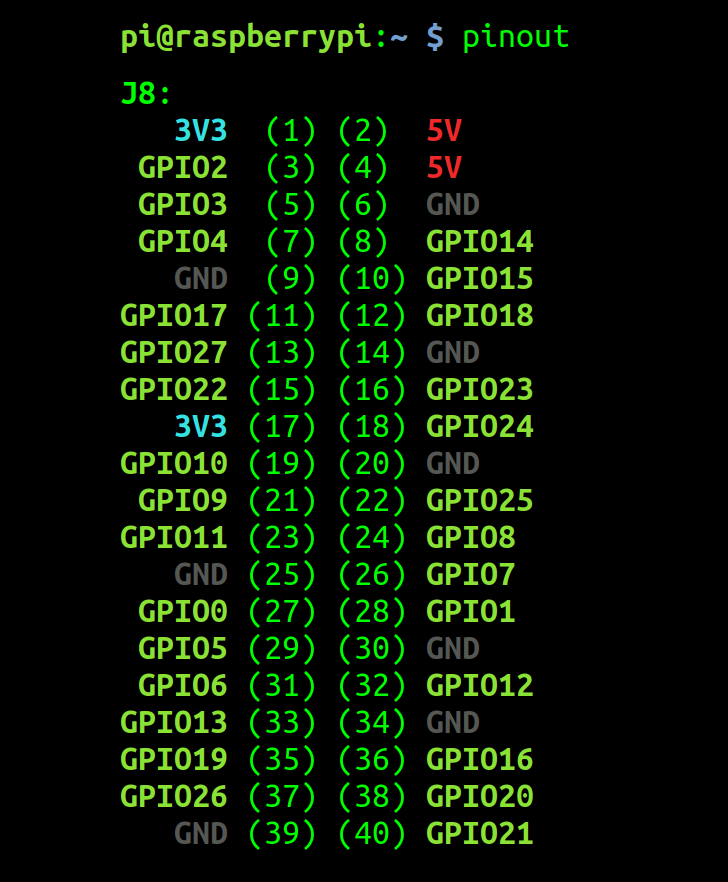
Before you go though the install process you should be aware that you can use the 'pinout' command to view the pin assignments of the Raspberry Pi:
pinout
Installing the Camera
Details about where to buy a Raspberry Pi camera and how to install it can be found in the article An Overview of How to Do Everything with Raspberry Pi Cameras. Once you're up and running with your Raspberry Pi camera, you can move on to the next section.
Installing the DS18B20 Temperature Sensor
One of the temperature sensors is the DS18B20. Here is a detailed description of how to setup and install the DS18B20 thermal probe.
Installing the DHT11 Temperature & Humidity Sensor
For the DHT11 humidity and temperature sensor the setup process is a bit simpler, check out this guide which shows the process using several different languages. This guide show the setup for two different models of the sensor. In my case, I have the 3 wire DHT11, although the ordering of the pins on my DHT11 sensor are different than the ones shown in this guide. For this guide, we'll focus on using Python so take note of the section on using the 'Adafruit_Python_DHT' repo in the previously linked guide. Also, I decided to power the DHT11 using the 3.3v on the Raspberry Pi instead of using the 5v as shown in this guide (to avoid the possibility of sending 5V signals to the 3.3v GPIO pins on the Raspberry Pi).
Here is a summarized version of the shell commands we'll use from this guide:
mkdir /tmp
cd /tmp
git clone https://github.com/adafruit/Adafruit_Python_DHT.git
cd Adafruit_Python_DHT
sudo apt-get install build-essential python-dev
sudo python setup.py install
Next, add this to a file called 'dht11.py' in your home directory:
# -*- coding: utf-8 -*-
import sys
import time
import Adafruit_DHT

def dht11_read_sensors():
  DHT11_GPIO_PIN_NUMBER=17

  rtn = {}
  rtn['dht11'] = {}
  try:
    humidity, temperature = Adafruit_DHT.read(Adafruit_DHT.DHT11, DHT11_GPIO_PIN_NUMBER)
    if humidity is None:
      rtn['dht11']['error'] = "Humidity is None."

    if temperature is None:
      rtn['dht11']['error'] += "Temperature is None."

    rtn['dht11']['temp_c'] = temperature
    rtn['dht11']['humidity'] = humidity
  except Exception as e:
    rtn['dht11']['error'] = "Some exception happened: " + str(e)

  return rtn

while True:
  readings = dht11_read_sensors()
  for t in readings:
    if not 'error' in readings[t]:
      print(u"Device id '%s' reads %.3f +/- 0.5 °C and %s%% humidity." % (t, readings[t]['temp_c'], readings[t]['humidity']))
    else:
      print(readings[t]['error'])
  time.sleep(1.0)
Make sure you don't add the above script inside of the 'Adafruit_Python_DHT' (otherwise the import will include the wrong identically named module and you'll get errors). Now run this script:
python dht11.py
and you should see output like this:
Temp: 23.0 C  Humidity: 34.0 %
Temp: 23.0 C  Humidity: 33.0 %
Temp: 24.0 C  Humidity: 34.0 %
Temp: 24.0 C  Humidity: 34.0 %
Sending Emails Through Amazon SES
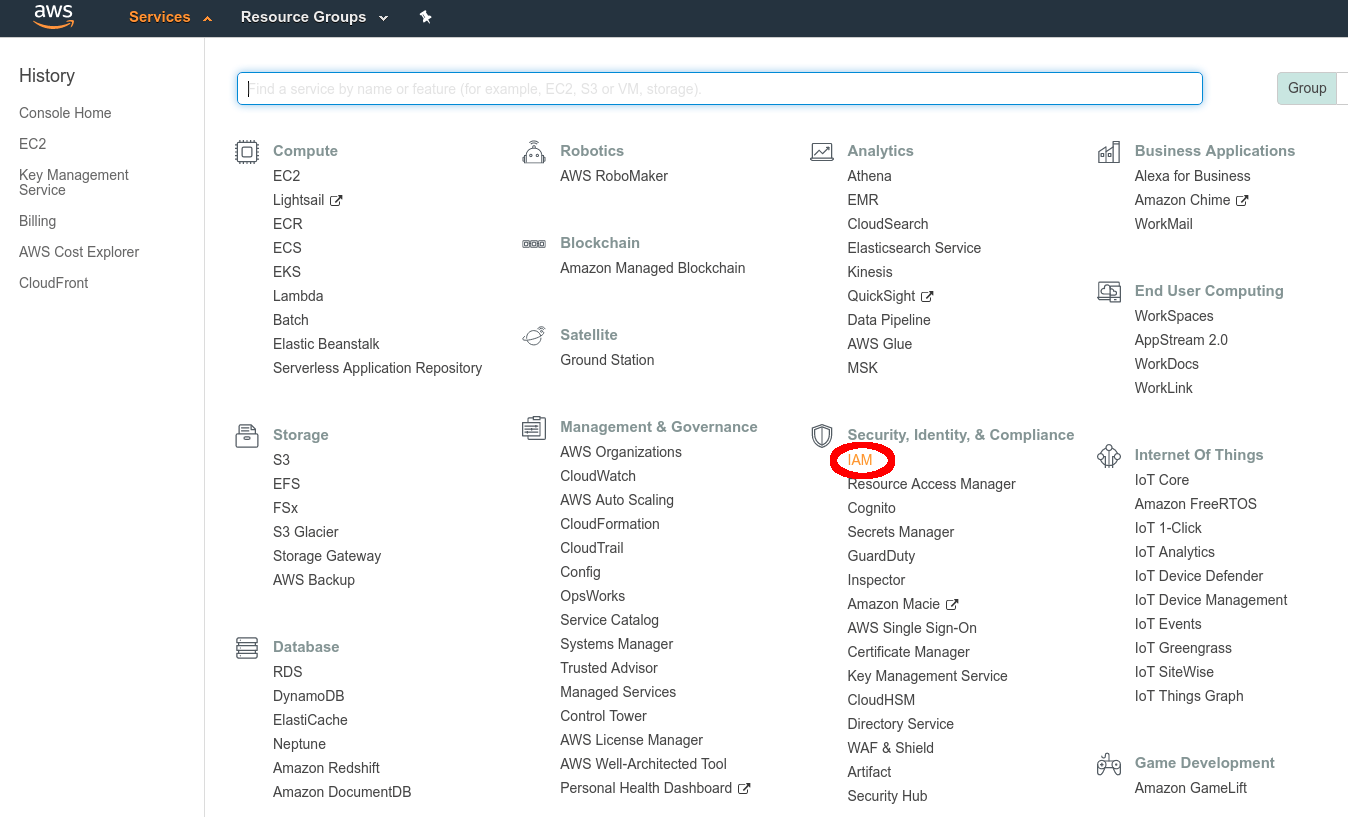
Capturing these sensor readings isn't very useful unless we do something with them. A standard way to receive regular updates is through e-mail. In order to programmatically send out email you'll need to make use of a third party service (or set up your own email server, and trust me: you don't want to do that). For this guide, I'll show you the process of sending out email updates using Amazon Web Service's product call 'SES' or Simple Email Service. Once you've got an AWS account, click on the services tab and select 'IAM'. This will allow us to set up a special user with programmatic access permissions:
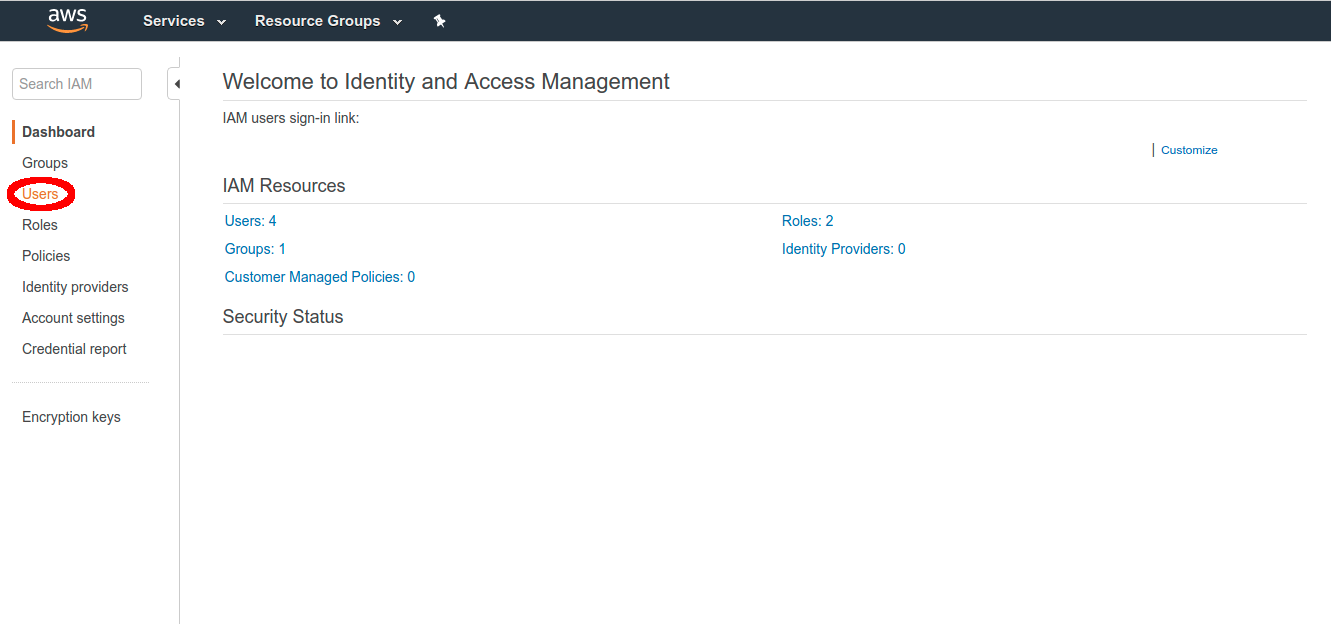
Click on 'Users' to set up a new user:
Click on 'Add user':

Enter a name for the new user name which you'll make reference to later. Make sure you enable Programmatic access since you'll need this to use AWS automatically from your Python script:

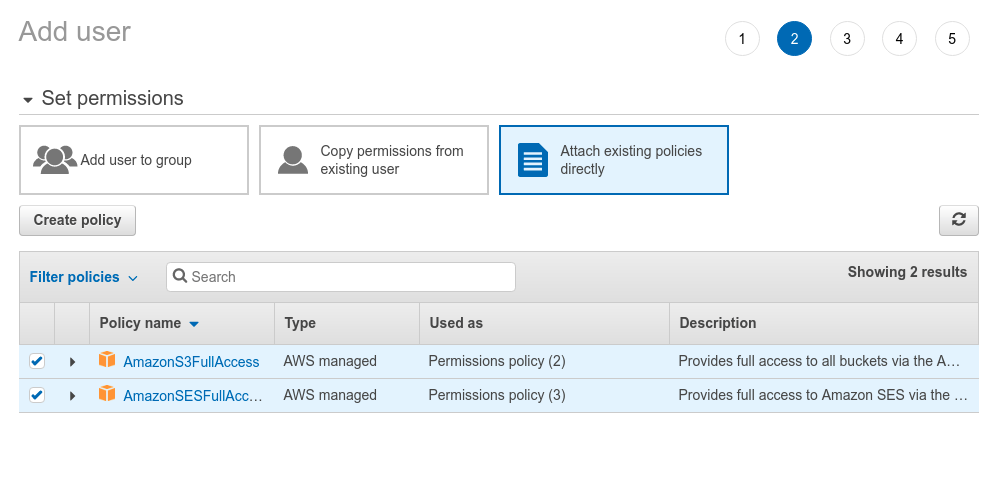
There are several different ways to give this user permissions to send emails and use S3, but we're just going to select 'Attaching existing policies directly'. Attaching a policy means 'assign a specific permission to do something' as far as we're concerned:
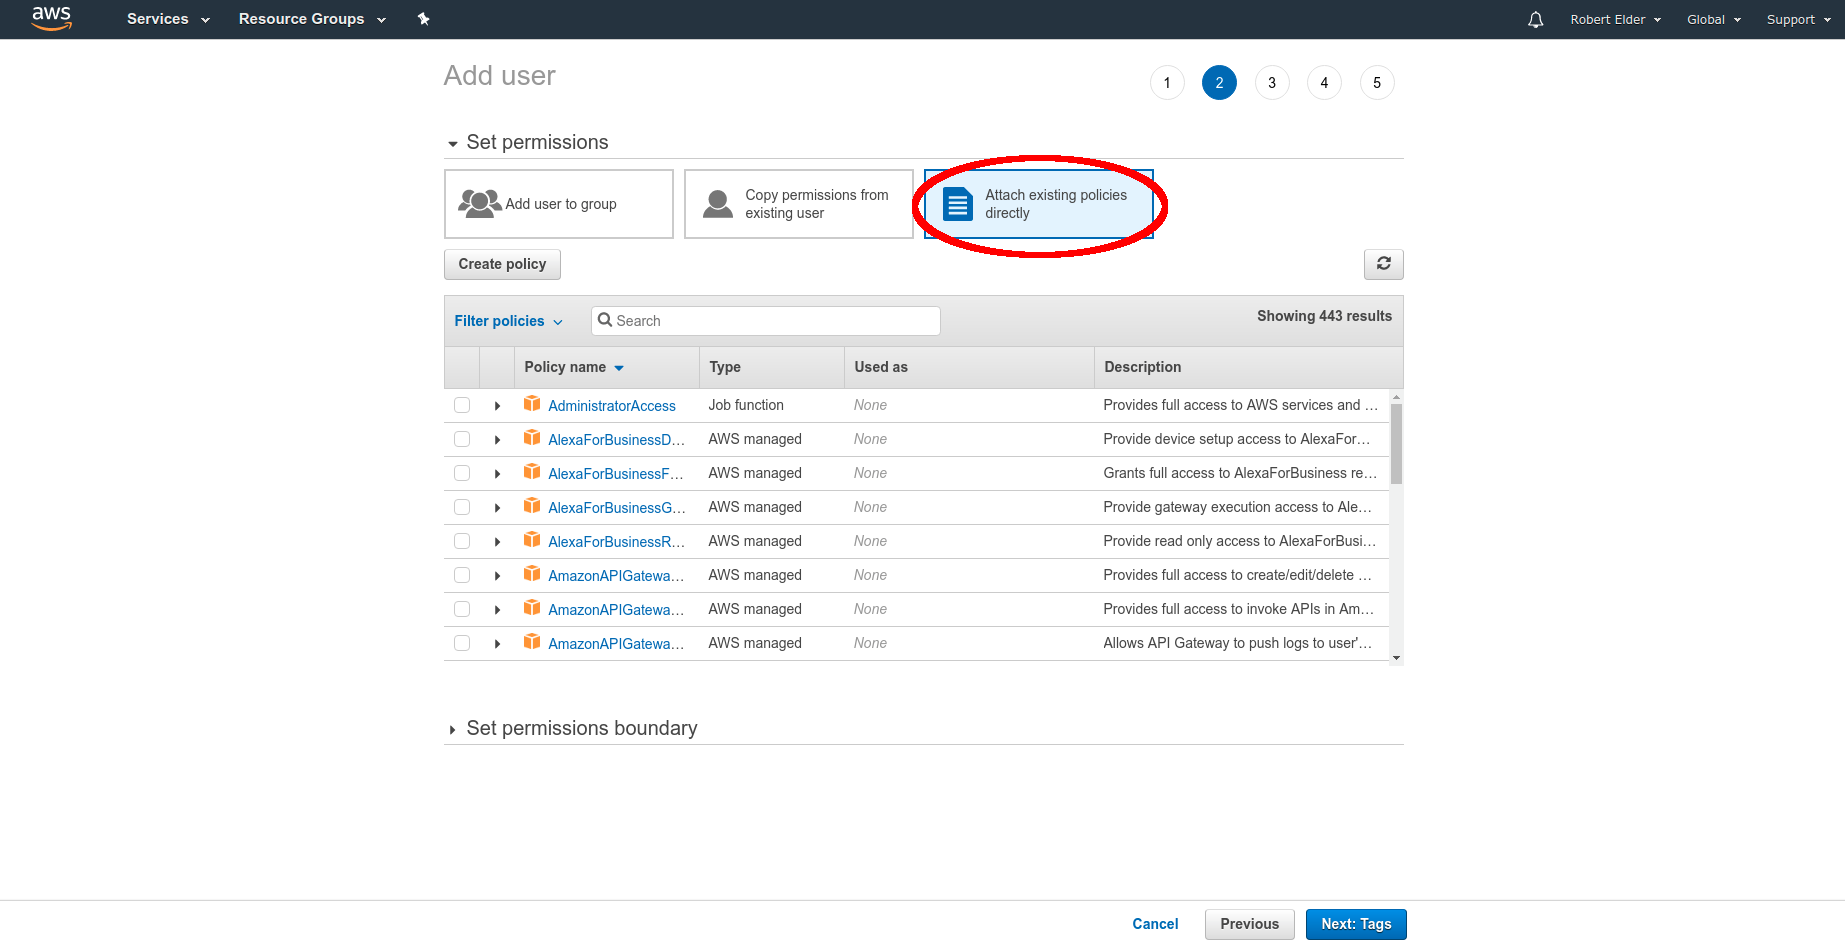
The two policies we want to attach are called:
AmazonSESFullAccess
AmazonS3FullAccess
Make sure these policies are selected:
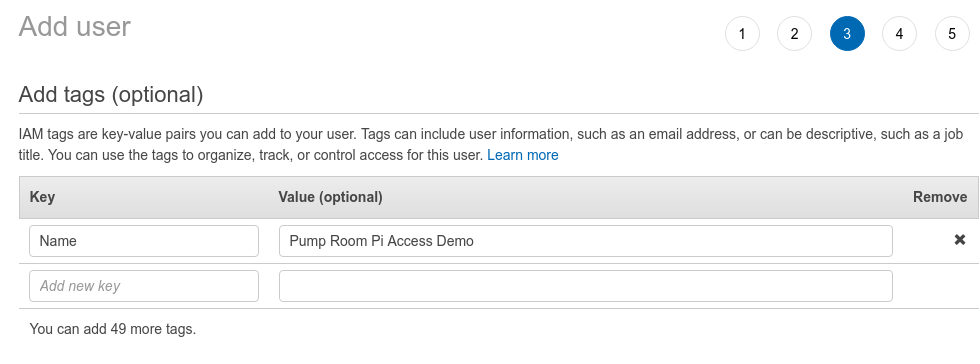
You can assign various tags to objects you create in AWS. Usually, it's good practice to assign a 'Name' for everything, but you don't have to.
This page shows the credentials that have been created for this user. For security reasons, these credentials are only presented to you once, so make sure you save them while you're on this page:
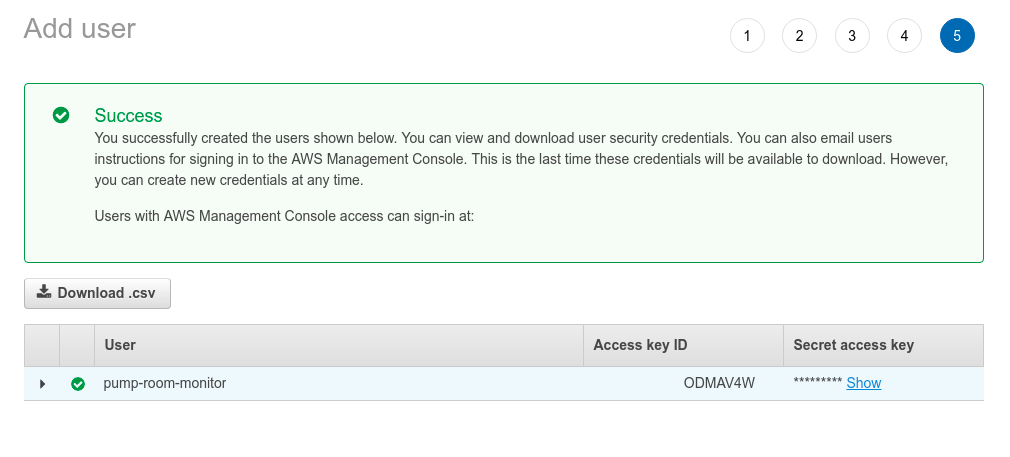
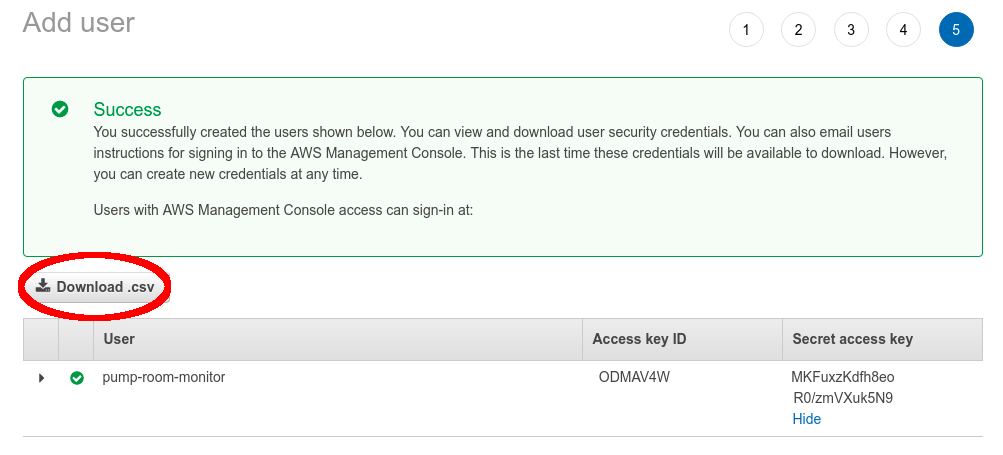
The secret access key should be kept extremely secret. Hackers routinely scan the internet for valid credentials of this type and use them to launch many servers and run up AWS bills of tens of thousands of dollars at the owner's expense.
You will place these credentials in your '~/.aws/credentials' file:
Now let's go through the set-up process for verifying your email so you can send mail as if it came directly from that address:
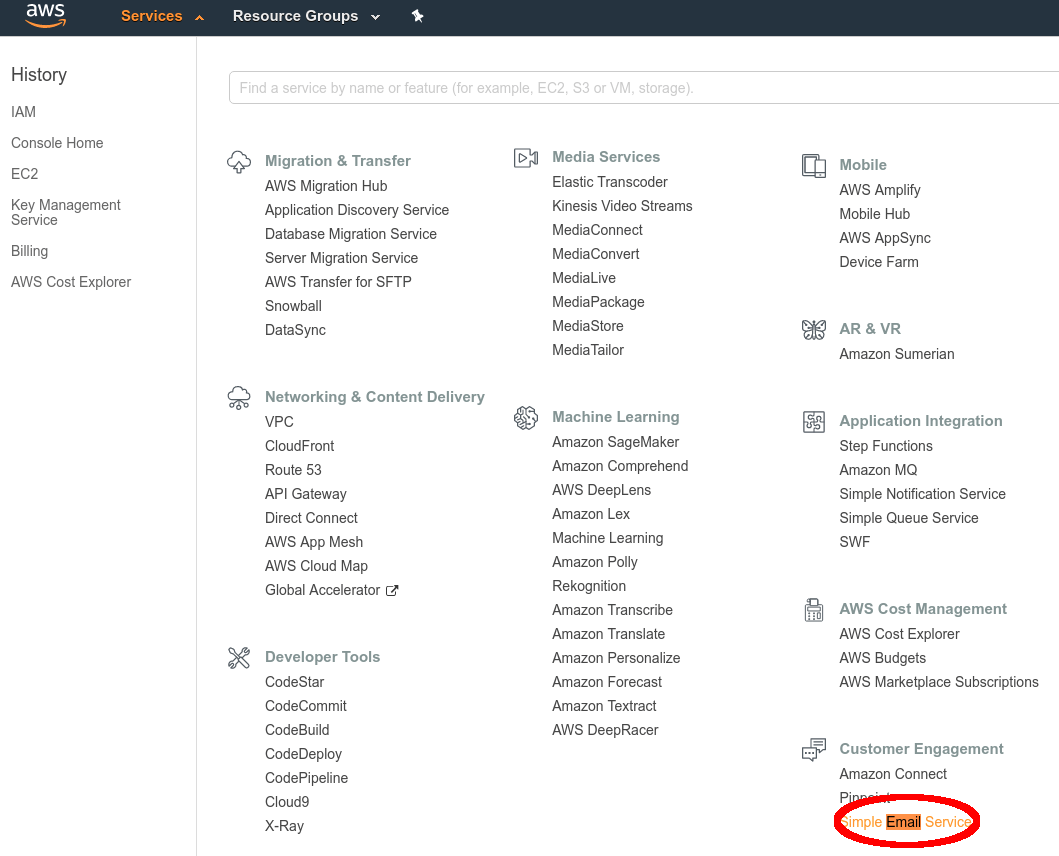
Click on the 'Email Addresses' section and click the button to 'Verify a New Email Address':
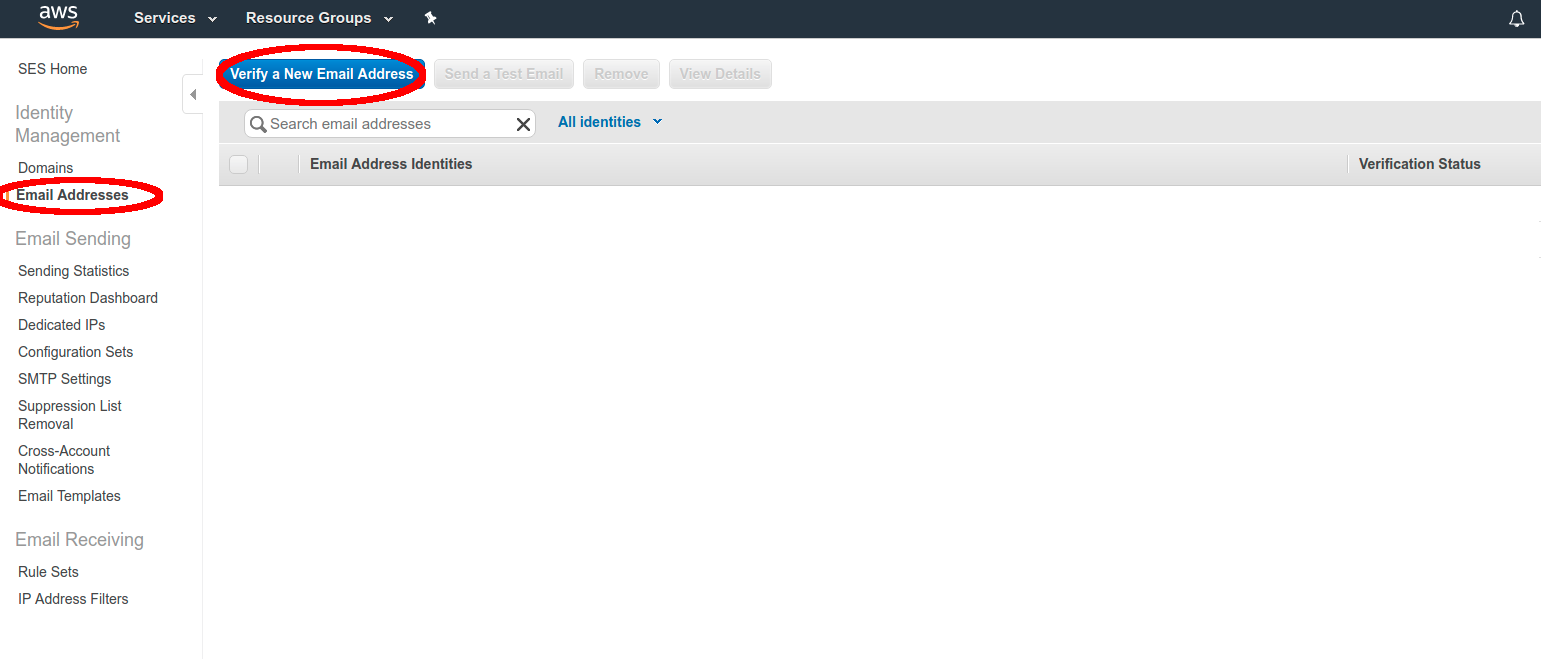
Now, enter the email address you want to appear as the 'sender'. In this example, I'll use 'info@robertelder.org' as the sender. After you add the email address you want to use, you just have to open the email and click on a link to prove that you are in control of that email address:

Here's what it looks like after you're verified:

Sending Emails In Python With Amazon SES
Now let's do a test to make sure we're able to use the credentials we just created to send emails from Python. Here are a couple of packages you'll need to install first:
sudo pip install awscli
sudo pip install boto3
Now add the credentials we just created in the previous section into a credentials file on the Raspberry Pi:
mkdir -p ~/.aws
#  Now add the credentials
nano ~/.aws/credentials
And here is an example of what your '~/.aws/credentials' file will look like:
[pump-room-creds]
aws_access_key_id=ODMAV4W
aws_secret_access_key=MKFuxzKdfh8eoR0/zmVXuk5N9
Remember, you should never share these credentials or leave them in an insecure place because they will allow anyone who uses them to do things on AWS on your behalf which will cost you money!
Now let's run a test email sending program to make sure everything is set up correctly. Put this inside a file called 'email_test.py' (just don't name it 'email.py' like I did at first: the name will conflict with an internal library and cause errors). Make sure you replace 'sender@example.com' with the email address you authorized as the sender above. Also, replace 'someone@example.com' with a recipient you'd like to receive the test email:
import boto3
import subprocess
import datetime
import os
from botocore.exceptions import ClientError

os.environ["AWS_SHARED_CREDENTIALS_FILE"] = "/home/pi/.aws/credentials"
os.environ["AWS_PROFILE"] = "pump-room-creds"

SENDER = "Pump Room <sender@example.com>"
AWS_REGION = "us-east-1"
SUBJECT = "Pump Room Report"
CHARSET = "UTF-8"
ses_client = boto3.client('ses', region_name=AWS_REGION)

try:
    BODY_HTML = ("This is a test email.")

    recips = ["someone@example.com"]
    for recipient in recips:
        try:
            response = ses_client.send_email(
                Destination={
                    'ToAddresses': [ recipient ],
                },
                Message={
                    'Body': {
                        'Html': { 'Charset': CHARSET, 'Data': BODY_HTML }
                    },
                    'Subject': { 'Charset': CHARSET, 'Data': SUBJECT },
                },
                Source=SENDER
            )
        except ClientError as e:
            print(e.response['Error']['Message'])
        print("Email sent! Message ID:"),
        print(response['MessageId'])
except ClientError as e:
    print(e.response['Error']['Message'])
except Exception as e:
    print(e)
Now, run the above script:.
python email_test.py
If everything worked, you should see a message id be output on the terminal. You should also receive an email at the address where you replaced 'someone@example.com'. If you didn't get the email, make sure it didn't end up in your spam folder. You'll often run into problems with anti-spam security features when sending emails through third-parties (and for good reason).
Uploading Files With An Amazon S3 Bucket
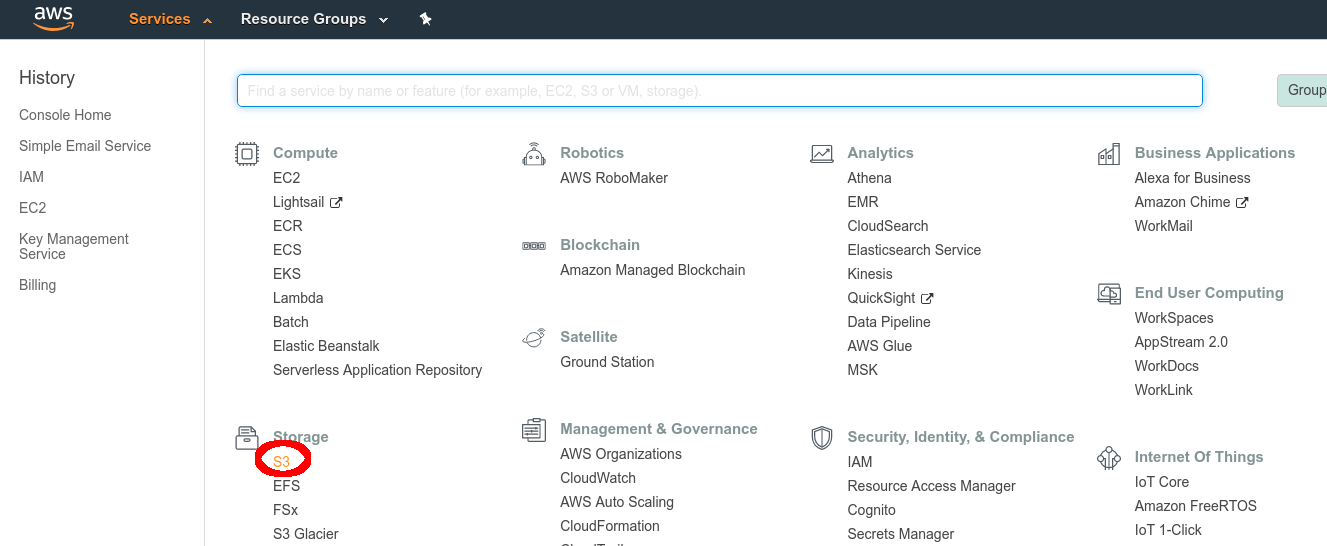
Now that we're able to send out email notifications, let's learn how to upload files to an S3 bucket so they can be easily linked in an email. Note that this guide will assume it's ok for any images or video you upload to be public. Since these are just images of a pump room, we don't have any privacy considerations. If you decide to re-purpose this solution for another purpose, you may want to re-consider this assumption. Otherwise you will be putting private information in a public place! To create your S3 bucket, first go to the S3 section in AWS:
Click 'Create bucket':
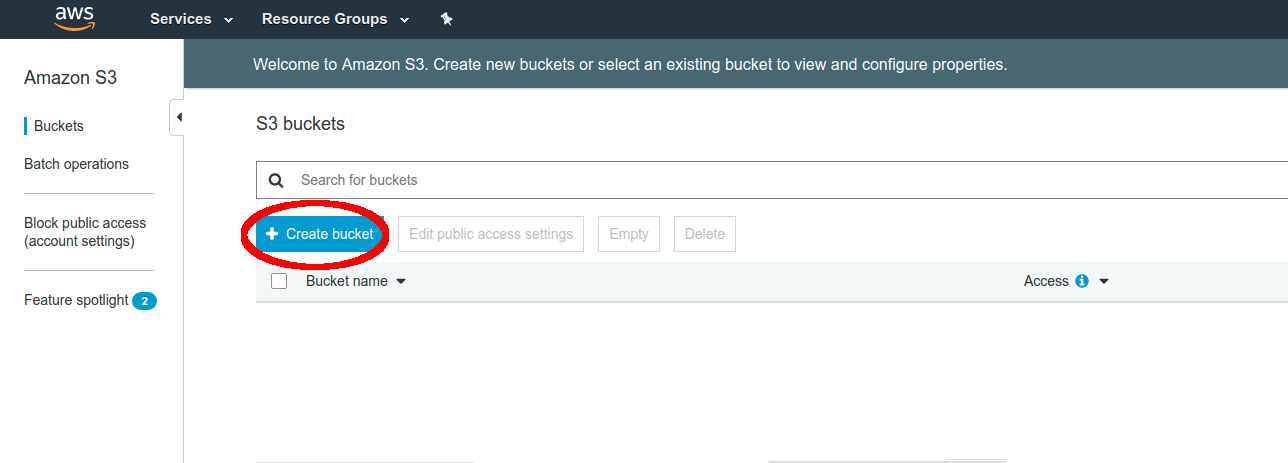
Now create a name for your S3 bucket. Note that S3 bucket names share a global namespace with the entire world (including everyone else's AWS account). This means you'll have to create a very unique name that no one else has though of before (just like a username):
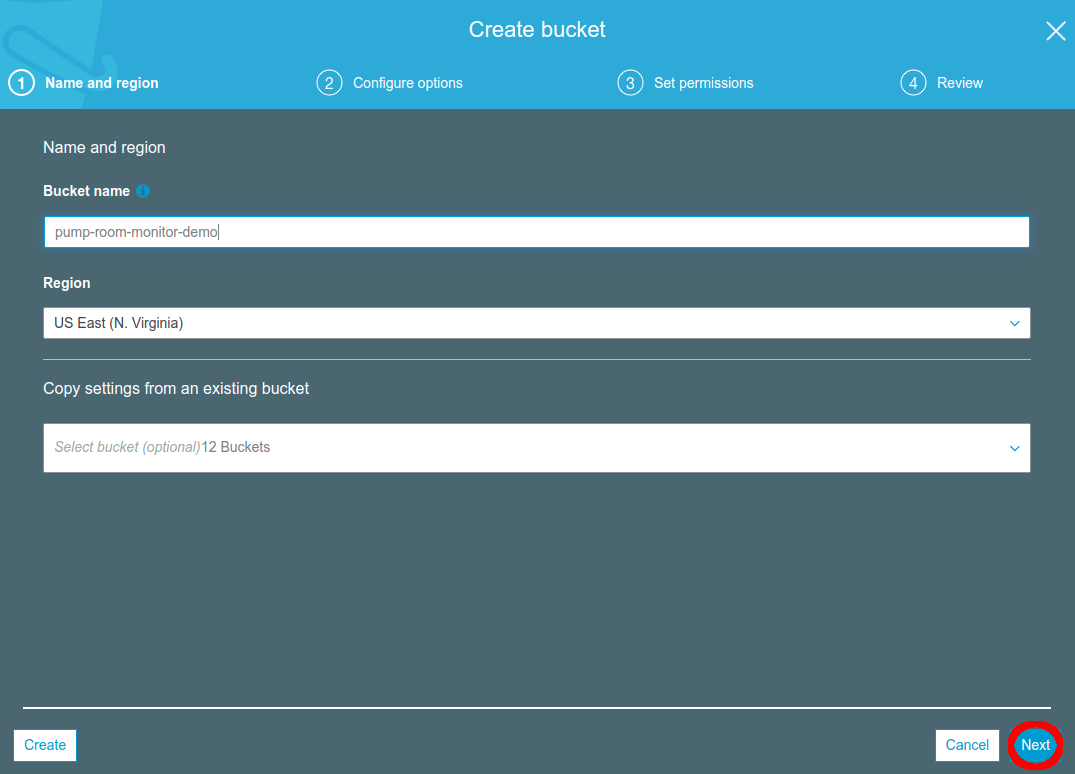
Just press 'Next' on this page:
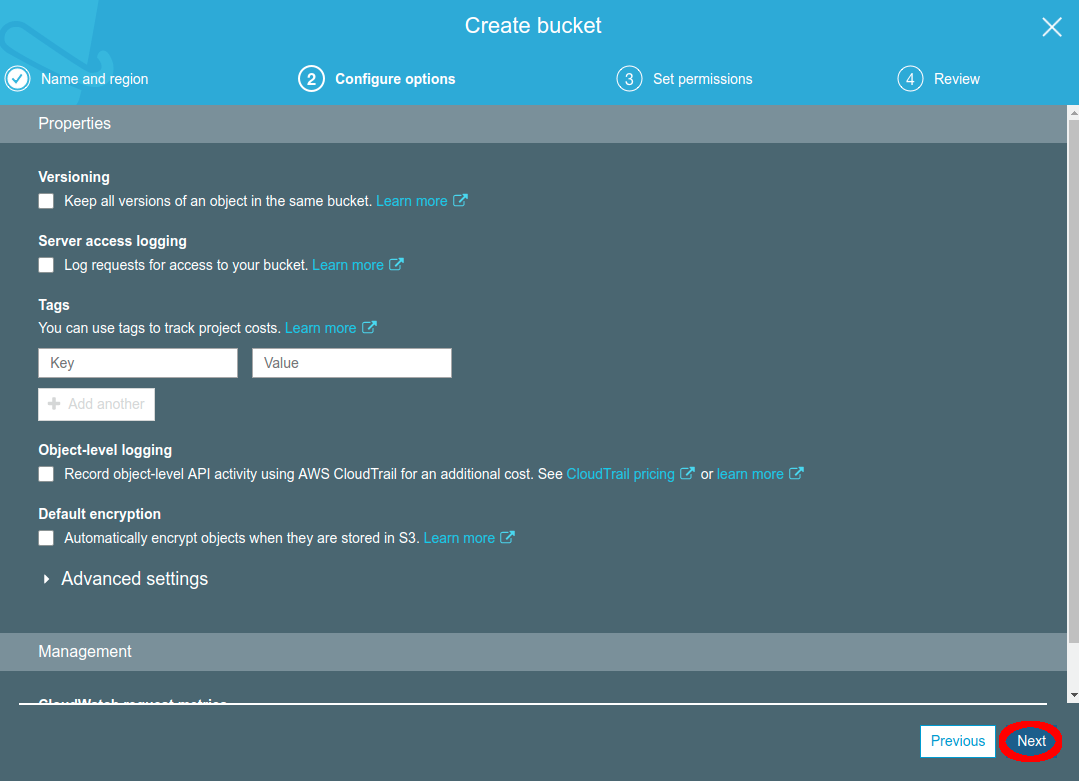
Since we're going to access these images publicly, uncheck the option to block all access:
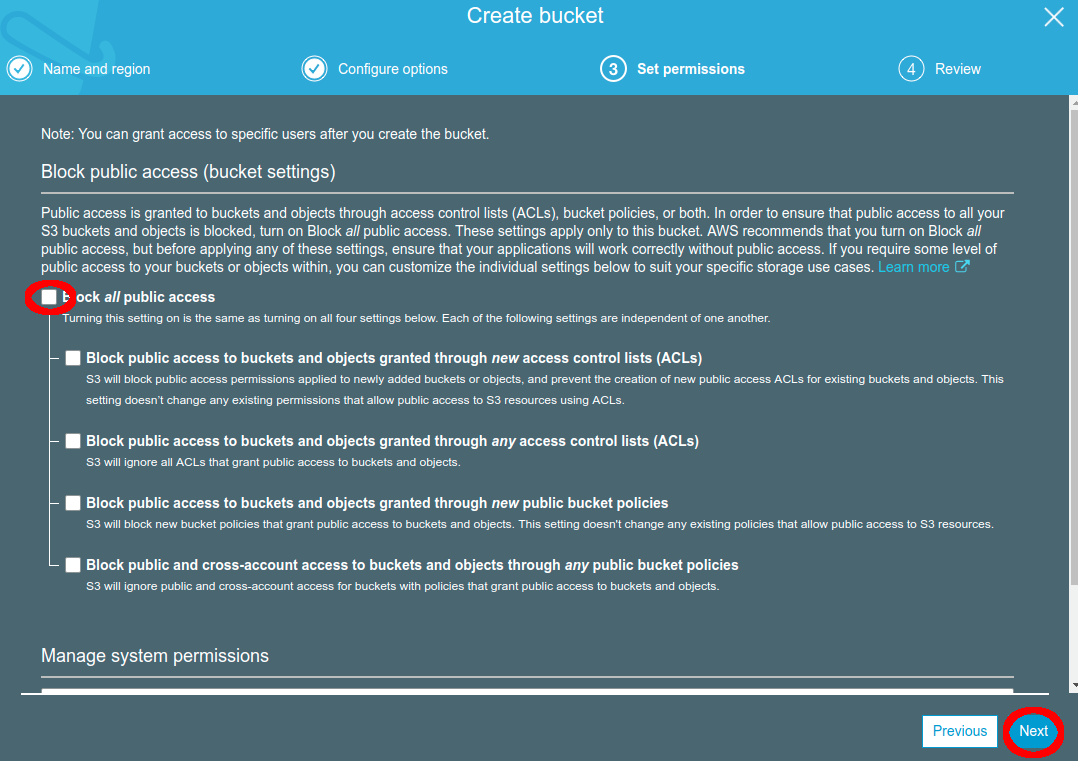
On the next page, just click 'Create'. Now let's do a test to make sure we can upload files to your S3 bucket. Create an image with the Raspberry Pi camera:
raspistill -o ~/foo.jpg
And put the following code inside a file called 's3_test.py':
import boto3
import subprocess
import datetime
import os
from botocore.exceptions import ClientError

os.environ["AWS_SHARED_CREDENTIALS_FILE"] = "/home/pi/.aws/credentials"
os.environ["AWS_PROFILE"] = "pump-room-creds"

s3_client = boto3.client('s3')
bucket_name = 'pump-room-monitor-demo'

def run_command(cmd_arr):
  rtn = ""
  try:
    child = subprocess.Popen(cmd_arr, stdout=subprocess.PIPE, stderr=subprocess.PIPE)
    stdout, stderr = child.communicate()
  except Exception as e:
    return "An exception happend when trying to run command: " + str(cmd_arr) + " "  + str(e) + "\n"
  return str(stdout)

try:
  upload_rtn = s3_client.upload_file("/home/pi/foo.jpg", bucket_name, "foo.jpg", ExtraArgs={'ContentType': "image/jpeg"})
except ClientError as e:
  f = open("/tmp/demofile.txt", "a")
  f.write(str(e.response['Error']['Message']))
  f.close()
  print(e.response['Error']['Message'])
except Exception as e:
  f = open("/tmp/demofile.txt", "a")
  f.write(str(e))
  f.close()
  print(e)
then run this script:
python s3_test.py
If it worked, you should be able to see a file in your S3 bucket in your AWS account now:
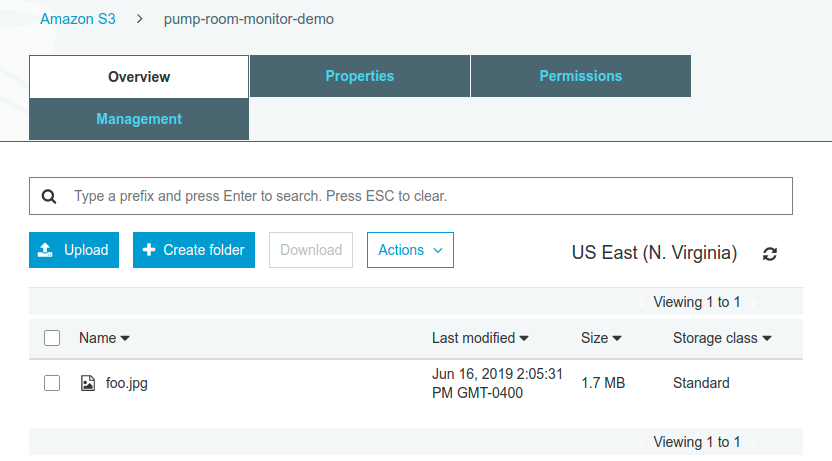
Each file uploaded to S3 can be available through a web browser with a URL that is based on the bucket name and filename. Usually, the URL is of the form 'https://BUCKETNAME.s3.amazonaws.com/FILENAME'. If you click on the file, the side will panel will present this URL. If you try to browser to this URL to see the picture, it's likely that you haven't yet set the file permissions to allow public viewing and you'll see an error message like this:
<Error>
  <Code>AccessDenied</Code>
  <Message>Access Denied</Message>
  <RequestId>5973DDE03EE34671</RequestId>
  <HostId>
    Xm9KtEEw+0dp2Q8QqT0xVkc0FACoETCtkkioXO+vGP55EpIKEwG5yMsGeB7g+Ld77qts6oUfd/o=
  </HostId>
</Error>
To fix this problem and allow public access to all files in your S3 bucket, create the following policy file in your current directory and name it 'pump-room-monitor-demo.json'. Just make sure to replace the S3 bucket name in this file ('pump-room-monitor-demo' in this case) with the actual bucket name you chose:
{
    "Version": "2012-10-17",
    "Statement": [
        {
            "Sid": "AddPerm",
            "Effect": "Allow",
            "Principal": "*",
            "Action": "s3:GetObject",
            "Resource": "arn:aws:s3:::pump-room-monitor-demo/*"
        }
    ]
}
Now run this shell command to apply this policy to your S3 bucket (make sure you replace 'pump-room-monitor-demo' with your actual bucket name, and replace 'pump-room-creds' with the IAM credentials name you created earlier):
aws s3api put-bucket-policy --bucket pump-room-monitor-demo --policy file://pump-room-monitor-demo.json --profile pump-room-creds --region us-east-1
Pulling It All Together
Now pull all of this together into one script. Put this in a file called 'pump_room_monitor.py' in your home directory:
# -*- coding: utf-8 -*-
import glob
import time
import re
import os
import sys
import Adafruit_DHT
import RPi.GPIO as GPIO
import subprocess
import boto3
import datetime
from botocore.exceptions import ClientError

os.environ["AWS_SHARED_CREDENTIALS_FILE"] = "/home/pi/.aws/credentials"
os.environ["AWS_PROFILE"] = "pump-room-creds"

s3_client = boto3.client('s3')
bucket_name = 'pump-room-monitor-demo'
temp_image_directory = '/dev/shm'

#  Set Pullup mode on GPIO14 first.
GPIO_PIN_NUMBER=14
GPIO.setmode(GPIO.BCM)
GPIO.setup(GPIO_PIN_NUMBER, GPIO.IN, pull_up_down=GPIO.PUD_UP)

def run_command(cmd_arr):
  try:
    child = subprocess.Popen(cmd_arr, stdout=subprocess.PIPE, stderr=subprocess.PIPE)
    stdout, stderr = child.communicate()
  except Exception as e:
    return "An exception happend when trying to run command: " + str(cmd_arr) + " "  + str(e) + "\n"
  return str(stdout)

def ds18b20_read_sensors():
  rtn = {}
  w1_devices = []
  w1_devices = os.listdir("/sys/bus/w1/devices/")
  for deviceid in w1_devices:
    rtn[deviceid] = {}
    rtn[deviceid]['temp_c'] = None
    device_data_file = "/sys/bus/w1/devices/" + deviceid + "/w1_slave"
    if os.path.isfile(device_data_file):
      try:
         f = open(device_data_file, "r")
         data = f.read()
         f.close()
         if "YES" in data:
           (discard, sep, reading) = data.partition(' t=')
           rtn[deviceid]['temp_c'] = float(reading) / float(1000.0)
         else:
           rtn[deviceid]['error'] = 'No YES flag: bad data.'
      except Exception as e:
         rtn[deviceid]['error'] = 'Exception during file parsing: ' + str(e)
    else:
      rtn[deviceid]['error'] = 'w1_slave file not found.'
  return rtn;

def dht11_read_sensors():
  DHT11_GPIO_PIN_NUMBER=17

  rtn = {}
  rtn['dht11'] = {}
  try:
    humidity, temperature = Adafruit_DHT.read_retry(Adafruit_DHT.DHT11, DHT11_GPIO_PIN_NUMBER)
    if humidity is None:
      rtn['dht11']['error'] = "Humidity is None."

    if temperature is None:
      rtn['dht11']['error'] += "Temperature is None."

    rtn['dht11']['temp_c'] = temperature
    rtn['dht11']['humidity'] = humidity
  except Exception as e:
    rtn['dht11']['error'] = "Some exception happened: " + str(e)

  return rtn

dht11_readings = dht11_read_sensors()
ds18b20_readings = ds18b20_read_sensors()
status_strings = []
for t in dht11_readings:
  if not 'error' in dht11_readings[t]:
    status_strings.append(u"Device id '%s' reads %.3f +/- 0.5 °C and %s%% humidity." % (t, dht11_readings[t]['temp_c'], dht11_readings[t]['humidity']))

for t in ds18b20_readings:
  if not 'error' in ds18b20_readings[t]:
    status_strings.append(u"Device id '%s' reads %.3f +/- 0.5 °C" % (t, ds18b20_readings[t]['temp_c']))

try:
  raspberry_pi_cpu_temp = float(re.findall("\d+\.\d+", run_command(["/opt/vc/bin/vcgencmd","measure_temp"]))[0])
  status_strings.append(u"Raspberry Pi CPU Temperature: %.1f °C" % (raspberry_pi_cpu_temp))
except Exception as e:
  status_strings.append(u"Error getting Raspberry Pi CPU Temp." + str(e))

current_datetime_str = str(datetime.datetime.now()).replace(":","-").replace(" ","-")

image_filename = current_datetime_str + ".jpg"
full_image_path = temp_image_directory + "/" + image_filename

try:
  run_command(["/usr/bin/raspistill",'-w', '640', '-h', '480', '-q', '75', "-o", full_image_path])
  try:
    s3_client.upload_file(full_image_path, bucket_name, image_filename, ExtraArgs={'ContentType': "image/jpeg"})
  except ClientError as e:
    print(e.response['Error']['Message'])
  except Exception as e:
    print(e)
  run_command(["rm",full_image_path])
except Exception as e:
  print(e)

s3_image_url = u"http://" + bucket_name + u".s3.amazonaws.com/" + image_filename
status_strings.append(u'<img width="100%" src="' + s3_image_url + "\" />")

report_str = "<br/>".join(status_strings)

#  Now that we have a full report, send it out via email:
SENDER = "Pump Room <sender@example.com>"
AWS_REGION = "us-east-1"
SUBJECT = "Pump Room Report"
CHARSET = "UTF-8"
ses_client = boto3.client('ses', region_name=AWS_REGION)

try:
  BODY_HTML = (report_str)

  recips = ["someone@example.com"]
  for recipient in recips:
    try:
      response = ses_client.send_email(
        Destination={
          'ToAddresses': [ recipient ]
        },
        Message={
          'Body': {
            'Html': { 'Charset': CHARSET, 'Data': BODY_HTML }
          },
          'Subject': { 'Charset': CHARSET, 'Data': SUBJECT }
        },
        Source=SENDER
      )
    except ClientError as e:
      print(e.response['Error']['Message'])
    #print("Email sent! Message ID:"),
    #print(response['MessageId'])
except ClientError as e:
    print(e.response['Error']['Message'])
except Exception as e:
    print(e)
And run it like this:
python pump_room_monitor.py
To run this automatically, you can set up a cron job. Run this command to edit your cron file:
crontab -e
Add add a line like this to run your monitoring Python script every 6 hours:
1 */6 * * * /usr/bin/python /home/pi/pump_room_monitor.py
Now you're all set with automatic updates to monitor your pump room!
Conclusion
In this article, we've reviewed a case study in how you could monitor the temperature, humidity and images from your pump room or basement using your Raspberry Pi. The images (or video) can be uploaded to Amazon S3 automatically from the Raspberry Pi, and email updates can be sent out using Amazon's SES service. Using Amazon AWS requires that the user first set up an IAM user with the appropriate permissions to access AWS on their behalf. The process of running the script that captures all this information and sends the emails regularly can be automated with a cron job.
 A Guide to Recording 660FPS Video On A $6 Raspberry Pi Camera
Published 2019-08-01 |
 Buy Now -> |
 An Overview of How to Do Everything with Raspberry Pi Cameras
Published 2019-05-28 |
 Using SSH to Connect to Your Raspberry Pi Over The Internet
Published 2019-04-22 |
 DS18B20 Raspberry Pi Setup - What's The Deal With That Pullup Resistor?
Published 2019-06-12 |
 A Beginners Guide to Securing A Raspberry Pi
Published 2019-04-22 |
 Using SSH and Raspberry Pi for Self-Hosted Backups
Published 2019-04-22 |
 A Surprisingly Common Mistake Involving Wildcards & The Find Command
Published 2020-01-21 |
| Join My Mailing List Privacy Policy |
Why Bother Subscribing?
|