Using SSH and Raspberry Pi for Self-Hosted Backups
2019-04-22 - By Robert Elder
Introduction
If you want, you can also download this guide as a single PDF.
The purpose of this guide is to show you the steps required to build your own automated backup solution that you can use for backing up source code or small files using git and SSH. This backup technique can be used to back up your data to another computer in your house or office, but you can also use it to back up to multiple locations over the internet securely.
This guide is targeted at individuals who plan to build this solution in an environment where the client and server will both use Linux. It may be possible to adapt the steps shown here to work on a Windows machine, but that won't be covered in this guide.
The following Linux commands will be used. Some of them will be explained below, but you may want to Google them if you've never seen them before:
- ip
- netstat
- sudo
- apt-get
- ssh
- vim
- nano
- git
In the rest of this article I will present the final solution as a series of smaller bite sized 'goals' that build upon each other. It may not be obvious how each individual goal connects to the final outcome of backing up your files, but eventually this will all be tied together.
Goal 0: Editing Files and Installing Prerequisites
Later in this guide, you'll need to make a few edits to files on the command-line. If you're new to using the command-line, this might be difficult for you if you don't know what editor to use. Personally, I use an editor called 'vim', but if you've never heard of that before, I suggest using 'nano'. With nano, you can edit or create a file by running a command like this:
nano somefile.txt
Here's what nano looks like:
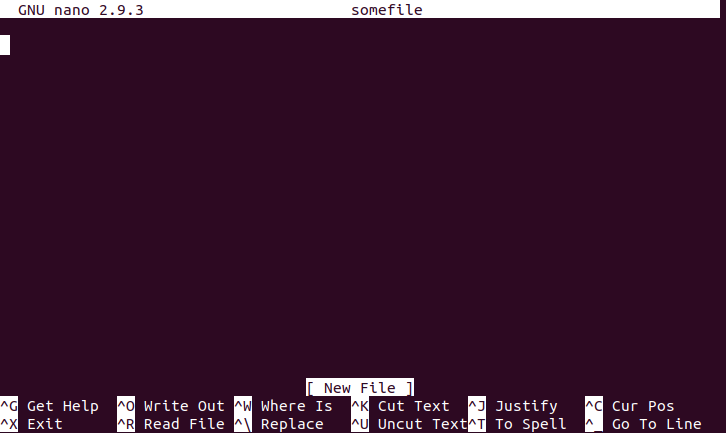
For the noobs out there, the instructions at the bottom of the screen that show the carrot symbol mean to press the control key and the letter key at the same time to perform the desired action. For example, to the '^O' means that you can press 'Ctrl + o' to 'write out' and save the file to disk. I won't say much else about nano since that's fairly off-topic and you can find guides online elsewhere.
Another thing to do before we get started is to install pre-requisites. I'll assume that you're using Ubuntu on your desktop/laptop. Here's the install command we need:
sudo apt-get install nmap git
You'll know that nmap is installed if you can run this command and get a version number back:
nmap -v
Once you've got nmap and git installed and you're confident that you can work with a command-line editor that can edit and create files, then you've completed goal 0!
Goal 1: Creating The Simplest git Remote
In this section, we'll make sure you have the confidence to set up your own git 'remote'. What is a 'remote' you ask? Well, it's the 'remote' place where your code and files end up when you do 'git push origin master' to push your code to GitHub (or BitBucket, or gitlab etc.). If you do a 'git clone ...', you are copying the files from the 'remote'. A 'remote' can be located on another computer, on GitHub, or even in another folder on the same computer. The simplest example of setting up a git 'remote' is actually just to create a directory on your computer and turn it into a 'remote'. First, let's make sure git is installed:
sudo apt-get update
sudo apt-get install git
Now, let's set up our git 'remote'. You can run these commands in any directory you like:
#  Set up and initialize a 'remote'
mkdir remote1
cd remote1
git init --bare
cd ..
#  Set up and initialize a local repo
mkdir my-repo
cd my-repo
git init
cd ..
The folder 'remote1' now contains a fully functional 'remote' that you can push code to, just like GitHub! The folder 'my-repo' contains an empty repo that you can start committing files to. Let's do that now:
cd my-repo
echo "This is my readme" > README.md
git add .
git commit -m "Create a readme file."
Now, what happens if you try to push to 'origin master'?
$ git push origin master
fatal: 'origin' does not appear to be a git repository
fatal: Could not read from remote repository.

Please make sure you have the correct access rights
and the repository exists.
It didn't work because we didn't describe the relationship between our current repo (the my-repo folder) to the remote (the remote1 folder)! You can list all remotes by using the following command:
git remote --verbose
But we don't have any 'remotes' set up, so let's add one right now called 'origin':
git remote add origin ../remote1
Now, let's check to see what remotes there are:
$ git remote --verbose
origin	../remote1 (fetch)
origin	../remote1 (push)
Now let's try to push again:
$ git push origin master
Counting objects: 3, done.
Writing objects: 100% (3/3), 235 bytes | 235.00 KiB/s, done.
Total 3 (delta 0), reused 0 (delta 0)
To ../remote1
 * [new branch]      master -> master
Awesome, it worked! We just created our own 'git remote' that we can push our repository to. This remote is still just on the same computer in another directory, but later we'll show how you can put it on another computer. You can even clone from the repo just like you would with any other git rep URL:
git clone /the/path/to/remote1/
Goal 2: Using SSH to Access Another Computer on the LAN
For this goal, we'll focus on making sure that you can use SSH to access the Raspberry Pi and run commands on it remotely. This goal doesn't have anything to do with git, but we'll use the two together in another goal. If you're not sure what 'SSH' is or what it does, you should do a quick skim of the article what is ssh before continuing with the goal.
For the following steps, I will assume that you're going to be working on a LAN setup that works something like this:
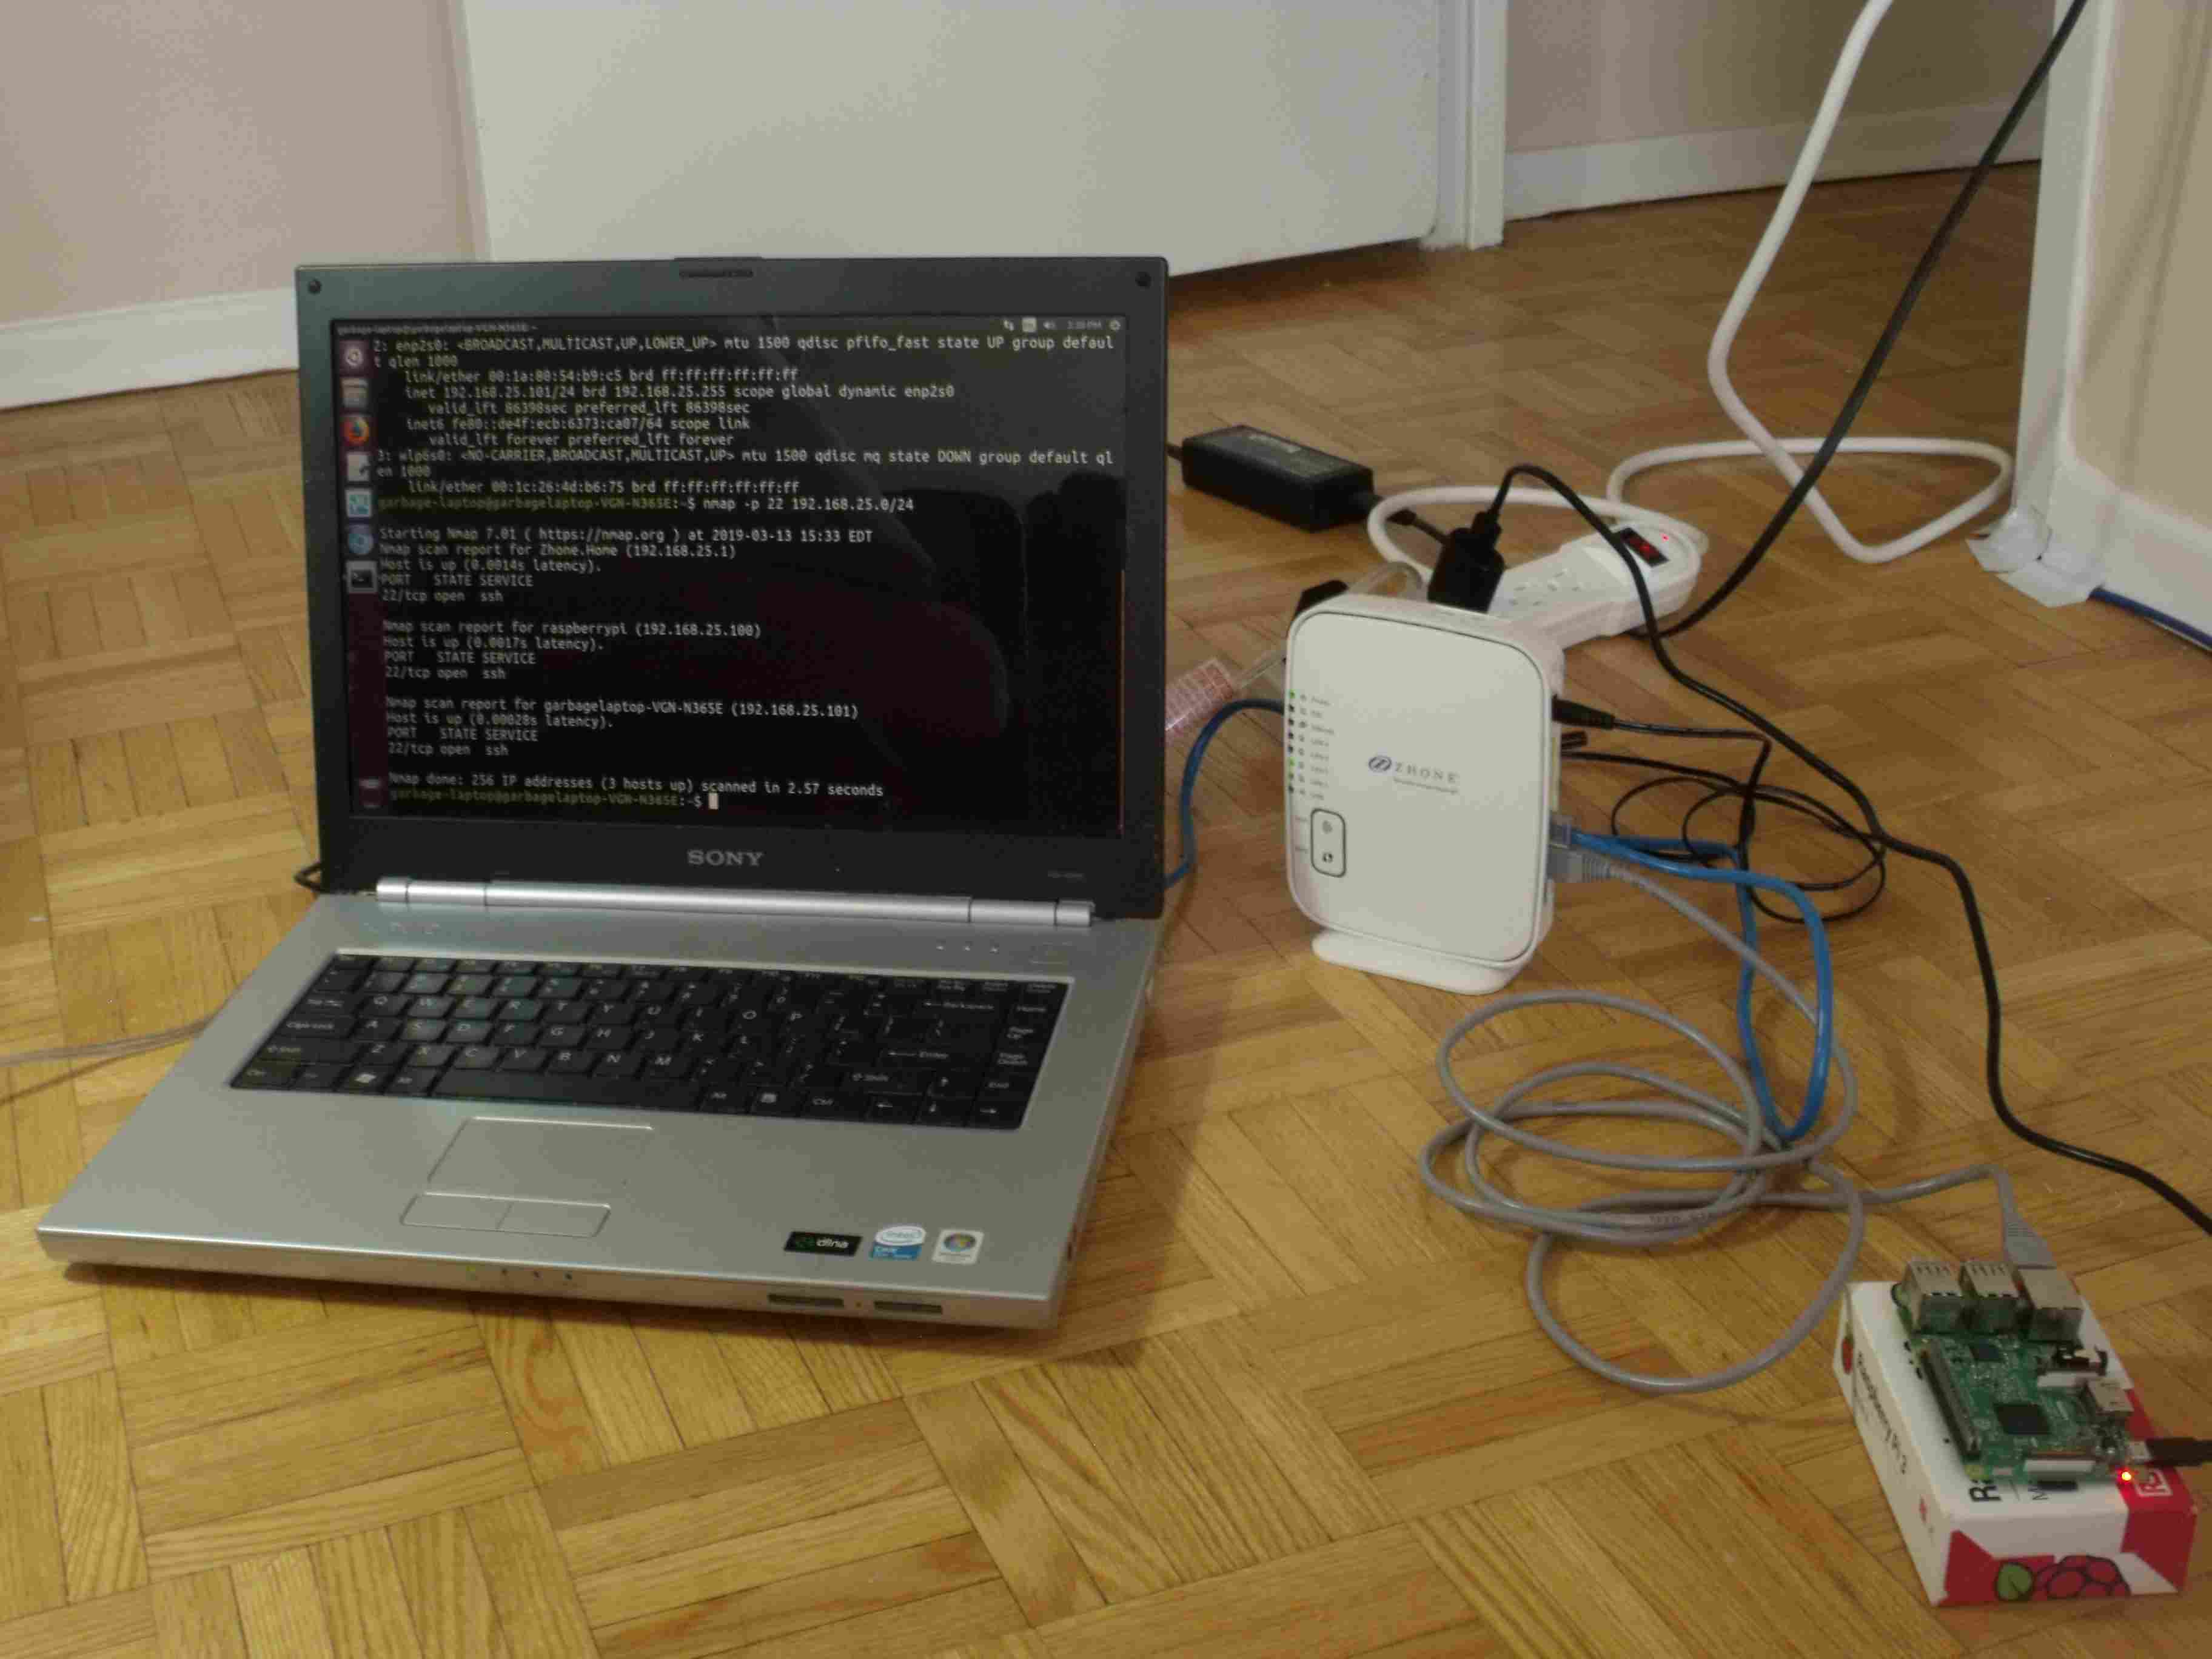
To describe the setup above, this is one where you have your main laptop or desktop connected to the router (using either ethernet cable of WiFi), and your Raspberry Pi also connected to the same router using an ethernet cable.
With this setup, the first thing we should do is identify what local IP address the Raspberry Pi has on the LAN. In order to do that, you can run this command from the laptop to help us:
ip address
Here's the output that I get on my current laptop:
1: lo: <LOOPBACK,UP,LOWER_UP> mtu 65536 qdisc noqueue state UNKNOWN group default qlen 1000
    link/loopback 00:00:00:00:00:00 brd 00:00:00:00:00:00
    inet 127.0.0.1/8 scope host lo
       valid_lft forever preferred_lft forever
    inet6 ::1/128 scope host
       valid_lft forever preferred_lft forever
2: enp3s0: <BROADCAST,MULTICAST,UP,LOWER_UP> mtu 1500 qdisc mq state UP group default qlen 1000
    link/ether d8:cb:8a:f3:2b:94 brd ff:ff:ff:ff:ff:ff
    inet 192.168.0.112/24 brd 192.168.0.255 scope global dynamic noprefixroute enp3s0
       valid_lft 580673sec preferred_lft 580673sec
    inet6 2607:f2c0:e570:1c01:19ef:d1a8:ebea:214f/64 scope global temporary dynamic
       valid_lft 563416sec preferred_lft 61948sec
    inet6 2607:f2c0:e570:1c01:83eb:165e:445b:b377/64 scope global dynamic mngtmpaddr noprefixroute
       valid_lft 563416sec preferred_lft 131416sec
    inet6 fe80::7f28:1a7d:9453:79b1/64 scope link noprefixroute
       valid_lft forever preferred_lft forever
3: wlp2s0: <BROADCAST,MULTICAST> mtu 1500 qdisc mq state DOWN group default qlen 1000
    link/ether ac:2b:6e:14:e9:cf brd ff:ff:ff:ff:ff:ff
Note the highlighted part, '192.168.0.112/24' in this example, which indicates that my laptop has IPV4 address 192.168.0.112 on my LAN with the first 24 bits of that address being common to every computer on the network. Please be aware that the number 192.168.0.112/24 is just an example and your IP address will be different. Usually, your LAN ip address will start with something like '192.168.0.', but some routers also use addresses that start with '192.168.1.' or '192.168.25.' by default. In fact if you look at the picture above closely, you'll see that on the computer I used to pose for this photo, its IP address was actually 192.168.25.101/24. Often, you can also manually configure this LAN IP address prefix on the router settings.
Now, since the Raspberry Pi is also connected to the same network as the '192.168.0.112/24' address, we can run a port scan using this command:
nmap 192.168.0.112/24
to show all computers on this same network that answer back on common open ports. Since we're specifically interested in using SSH to access the Raspberry Pi, you can use this more specific command to only look for computers that answer back on port 22 (the default SSH port):
nmap -p 22 192.168.0.112/24
Note that sometimes, I've found that you will need to explicitly specify port 22 in order for the open port to actually be found. I've also experienced situations where I need to repeat the scan several times before it detects the open port. I assume that this is related to some kind of security filtering that certain routers do. Once you finish running nmap, you should see something like this:
Starting Nmap 7.60 ( https://nmap.org ) at 2019-00-00 23:19 EDT
Nmap scan report for router (192.168.0.1)
Host is up (0.00051s latency).

...
Nmap scan report for 192.168.0.177
Host is up (0.00054s latency).

PORT   STATE SERVICE
22/tcp open  ssh
...

Nmap done: 256 IP addresses (N hosts up) scanned in 2.55 seconds
In this example, the IP address 192.168.0.177 is the address of the Raspberry Pi when it connects to my router, and doing a port scan with nmap was how we found it. When you run this command, you might get multiple results that have port 22 open, and if that's the case, it means you probably have multiple computers connected to the router that are running SSH. If you don't find any other computers that are running SSH, the Raspberry Pi might not have been set up to have its SSH server turned on yet! Newer versions of the Raspberry Pi operating systems usually have SSH disabled by default. Here is some Raspberry Pi documentation that describes how to enable SSH.
At this point, you should be able to run this command:
ssh pi@192.168.0.177
And, depending on how much you've set up your Raspberry Pi, it will likely ask you for a password. Do a Google search to find out the default password for your version of the Raspberry Pi OS. Once you successfully get access to the raspberry Pi them you've completed this goal. Here's a picture of what success looks like:

You can use the 'exit' command to exit out of the Raspberry Pi SSH session:
exit
You have now successfully completed goal 2!
Goal 3: Using Public And Private Keys.
How To Set Up and Distribute SSH Key Pairs.
Goal 4: Setting Up An SSH config File
For this goal, our objective is to make it easier to use SSH to access your Raspberry Pi. For example, we'll make it so that instead of typing this:
ssh -i ~/.ssh/my-first-keypair pi@192.168.0.177
you can type this instead:
ssh pi-backup
which is much shorter and easier to remember!
The way to accomplish this is by editing a file located at '~/.ssh/config'. It's likely that this file won't already exist, and you'll have to create it. Run this command to edit the ssh config file:
nano ~/.ssh/config
And to set up the alias for 'pi-backup', add this to the file:
Host pi-backup
    HostName 192.168.0.177
    Port 22
    User pi
    IdentityFile ~/.ssh/my-first-keypair
Then save and exit. Also, keep in mind that the IP address '192.168.0.177' written above is just a specific example. You'll need to replace it with the IP address of your Raspberry Pi. Once you do, you should now be able to run this command:
ssh pi-backup
Once you're able to SSH into the Pi using this easier method, you've successfully completed goal 4!
Goal 5: Pushing to a repository on the Raspberry Pi Through SSH
Now we're ready to do something that looks a bit closer to actually backing up files onto your Raspberry Pi! Remember all the steps you did for goal 1? You're going to repeat them, but with a couple differences. First, let's use SSH to log into the Pi:
ssh pi-backup
Now, set up a git 'remote' in your home directory on the Raspberry Pi:
#  Set up and initialize a 'remote'
mkdir my-first-backup.git
cd my-first-backup.git
git init --bare
Then exit back to your laptop/desktop computer:
exit
Now create a local git repo on your laptop/desktop and add some data into it:
#  Set up and initialize a local repo
mkdir my-repo
cd my-repo
git init
echo "Hello World" > README
git add .
git commit -m "Create a readme file."
The last step is to tell the local git repo that the 'remote' we want to use can be accessed through an SSH tunnel using git. For this we add a remote that uses the ssh config file alias as the prefix followed by the directory on the Raspberry Pi where we set initialized the remote. We'll also run a one-time-step the set 'master' as the default branch on the remote.
git remote add pi-backup pi-backup:~/my-first-backup.git
git push --set-upstream pi-backup master
You should now be fully set up to push and pull to the repo located on your Raspberry Pi! Let's do another test just to make sure everything is working:
echo "Awesome" >> README
git add .
git commit -m "Edited readme file."
And now when you run this command:
git push pi-backup
And you should see something like this:
Counting objects: 3, done.
Writing objects: 100% (3/3), 226 bytes | 226.00 KiB/s, done.
Total 3 (delta 0), reused 0 (delta 0)
To pi-backup:~/my-first-backup.git
 * [new branch]      master -> master
If you do, you've completed goal 5!
Goal 6: Securing the Raspberry Pi
I strongly recommend that you consider securing your Raspberry Pi if you want to keep this solution up for any amount of time. You can read Beginners Guide to Securing A Raspberry Pi for more details on this.
Setup Notes For Old Laptop
There isn't a lot to say about this topic, but is worth mentioning that you could also make this backup solution work on an old spare laptop. I would suggest installing Ubuntu on the old laptop since most of the install instructions listed here that work for the Pi will also work on Ubuntu. You can download a copy of Ubuntu here.
Setup Notes For Raspberry Pi
If you bought a brand new Raspberry Pi, you may or may not need to flash the SD card with a new OS image. Some Raspberry Pi kits come with an OS like Raspbian pre-installed. If it is pre-installed, you should take note of what version of the OS is pre-installed.
If an OS other than Raspbian is installed, you will need to consult the documentation for that OS to learn how to make sure SSH will be set up and ready to use.
If you decide to install a custom version of Raspbian OS yourself or if your SD card came blank, consult the guide at Raspbian install instructions which provides and overview of the process for Windows, Linux and Mac.
Before you install Raspbian OS, you will notice that there are at least two different versions of the OS image. One is called the 'desktop' version, and one is called the 'lite' version. The 'desktop' version includes all the software needed to present a nice user interface that reminds you of Windows with lots of clickable buttons and icons etc. The 'lite' version doesn't have any of this and expects you to know Linux commands because it only presents you with a terminal where you can type in commands. If you're a n00b, you should probably go with the 'desktop' version. If you're more experienced with Linux commands, you may prefer the 'lite' version because it will run faster, use less RAM and it won't require a larger size SD card.
Once you've got your Raspbian OS installed, the next thing to do is make sure that you have an SSH server running on it so you can access it through the command-line. Consult this article on setting up SSH on Raspbian OS for details. If you're using the UI, there is an easy UI feature to enable SSH. &nbps;If you're on the command-line, you can do:
sudo touch /boot/ssh
Then, reboot the Raspberry Pi, and run the following command to make sure that the SSH server is running:
ps -ef | grep sshd
You should see at least one entry that contains a reference to the sshd executable '/usr/bin/sshd' like this:
root 1234 1 0 07:46 ? 00:00:00 /usr/sbin/sshd -D
If you don't, then the SSH server is probably not running and you'll have to debug why.
Static Versus Dynamic IPs
The backup solution described by this article has assumed that you have your Raspberry Pi hosted on the LAN on a given local IP address (192.168.0.177 in our example). However, we haven't considered the fact that next time you reset all your devices, this IP address is not guaranteed to be the same. This will mean that any SSH rules you've set up won't work anymore. But how do we solve this problem to make sure our backup solution is truly always 'automatic'? The answer to this question involves the DHCP protocol, which you may want to read up on.
There is more than one way to guarantee that our Raspberry Pi always has the same IP address on our local network, and two different general approaches are:
- 1) Change the settings in your router to always assign the Raspberry Pi the same IP address. - Using this solution you will change some setting on your router only and leave all of the settings alone on your Raspberry Pi. Your Raspberry Pi will continue to use the DHCP protocol to obtain a 'dynamic' IP address, but the router will remember that your Raspberry Pi (specifically its MAC address) should always be assigned the same address. If you don't know how to log into your router's admin page, check the back of the router as it will usually have some default username/password and IP address printed on it. You can log into many common household routers by using a web browser to access '192.168.0.1'. You can also use the nmap command discussed elsewhere in this guide to scan for anything on the LAN that talks on port 80.
- 2) Change the Raspberry Pi's configuration to give it a static IP address. - Using this method, you change some of the network setting on your Raspberry Pi so that it always uses the same IP address every time it boots up. In this case, it does not rely on the DHCP server hosted on your router to decide what IP address it has. It simply chooses to use an IP like '192.168.0.177' regardless of what everything else on the network is doing. In this situation, you need to be careful to make sure nothing else gets assigned the same IP address on the network, otherwise both computers would experience problems.
Option 1 is probably the easiest, although it assumes that your router includes such a configuration feature. Usually, what you can do is connect the Raspberry Pi to the Router, and then log into the router admin panel where it will show you what devices are connected, and then present you with the option to pin an IP address somewhere.
If you decide to use a static IP address for the Raspberry Pi, you should be careful not to use a static IP address that is not within the DHCP lease range that the router can assign. Otherwise, there could be a case where the router accidentally assigns the same IP address that your router is using to another computer on the network To determine the DHCP lease range, you can likely find it somewhere inside the router's admin panel. Also, make sure that the static IP that you use has the same subnet mask.
For more reading on this topic, consult Q/A on Assigning a fixed IP address to a machine in a DHCP network.
Making it Work Over The Internet
It's great to be able to make local backups in your home or office, but wouldn't it be great to be able to do backups from anywhere that you can get an internet connection? This is totally possible!. There are actually many ways to accomplish this task, but I'm going to show you one method that involves setting up a proxy server with your favourite cloud provider, and then tunneling the connection to the Raspberry Pi through the proxy server, and down to your Pi. For instructions on how to use SSH tunneling over the internet through a proxy server, see Using SSH to Connect to Your Raspberry Pi Over The Internet.
Automation Using Cron
Cron jobs are fast and easy way to automate various tasks on a Linux/Unix system. In order to set up a cron job, you can open up the crontab editor and edit up your user's cron file where you use a special syntax to describe what Linux command you want to run, and when you want it to run. The first time you try to edit your crontab file, it will usually ask you what editor you want to use. I would suggest using nano if you're not experienced with command-line editors yet.
crontab -e
Here is an example of a cron file that has a single entry that will run the script 'do-backup.sh' once per day at 6:01pm:
# Edit this file to introduce tasks to be run by cron.
#
# Each task to run has to be defined through a single line
# indicating with different fields when the task will be run
# and what command to run for the task
#
# To define the time you can provide concrete values for
# minute (m), hour (h), day of month (dom), month (mon),
# and day of week (dow) or use '*' in these fields (for 'any').#
# Notice that tasks will be started based on the cron's system
# daemon's notion of time and timezones.
#
# Output of the crontab jobs (including errors) is sent through
# email to the user the crontab file belongs to (unless redirected).
#
# For example, you can run a backup of all your user accounts
# at 5 a.m every week with:
# 0 5 * * 1 tar -zcf /var/backups/home.tgz /home/
#
# For more information see the manual pages of crontab(5) and cron(8)
#
# m h  dom mon dow   command
1 18 * * * /home/robert/do-backup.sh
The lines that start with '#' are just comments.
For the actual backup script, you can use something like this:
#!/bin/bash

cd ~/my-repo
git push pi-backup master
Just replace the directory name, the remote and the branch name with whatever git repo you can to push.
The syntax for cron jobs is easy to forget, and it can also get more complicated. A really good site for remembering cron syntax can be found on https://crontab.guru/.
You can also use a cron job to regularly run the script provided in the section 'Making it Work Over The Internet' to make sure that the Raspberry Pi will regularly make sure that the remote connection tunnel is always listening for new SSH connections even if the tunnel dies, the power reset, or something else breaks the connection. Assuming that you put the script inside a file called '~/connection-script.sh' you could do:
5 * * * * ~/connection-script.sh
Which will run the connection keep-alive script every hour, 5 minutes after the hour.
Another use for cron is to create a rule to periodically install updates, although there is also an automatic updates feature that may be better suited to this purpose.
Flash Storage Issues
Some people encounter issues with corrupted SD cards in with their Raspberry Pi setup. You can read in detail about some of the causes and solutions to the problem of flash storage.
Using An External USB Disk
One way to avoid using flash completely is to use an external hard drive to host the data that you're backing up. When you plug in most USB hard drives, you can usually find out where they have mounted by using the 'df' command. You'll see output like this:
Filesystem      1K-blocks       Used  Available Use% Mounted on
udev             10200812          0   10200812   0% /dev
tmpfs             2046288       1204    2045084   1% /run
/dev/sda1       921923300  589451908  285570556  68% /
/dev/sdb1      3844607992      90140 3649152324   1% /mnt
Where, in this case, the 'sdb1' entry is the external USB hard disk. In your case, the device name will be different, but it will sometimes auto-mount to '/mnt'. If you don't see your external USB in the output of 'df', then it might not be mounted. In order to mount it, you'll need to use a tool like 'fdisk' which can list off all storage devices, even ones that are not mounted. Explaining fdisk is beyond the scope of this article, but if you do end up using it just make sure you read the documentation. Fdisk is able to modify partition tables of your storage devices, and if you accidentally edit a partition table of one of your storage devices, you could lose all your data!. After you find out which storage device is your USB disk, you can use the 'mount' command to manually mount it.
However, there is a problem with using the 'mount' command to manually mount the USB disk: You may need to manually re-mount it every time you reboot the Raspberry Pi, otherwise, when your script tries to push data to a git repo stored on the disk that isn't mounted, it will fail.
You can fix this problem by editing the '/etc/fstab' file and instructing it to auto-mount the USB disk every time the Raspberry Pi starts. One draw-back of editing the fstab file is that, by default, it will interrupt the boot process if the disk is not present when it tries to mount. This makes sense when for a server with an internal hard disk, but for a removable USB drive that you may take out every once in a while, it can be annoying. Therefore, you can use a special 'nofail' option in the fstab entry to prevent it from hanging up the boot process:
UUID=1234XXXX-AAAA-BBBB-CCCC-DDDDEEEEFFFF /mnt-my-USB ext4 defaults,nofail 0 0
Also, be very careful when editing your fstab file, and make sure you know what you're doing. If you accidentally switch where your disks are mounted or break your boot process, it may cause mistakes that lead to data loss.
Finally, in order to add these entries in a way that is consistent under different race conditions from which device is detected first, use the UUID based method of identifying devices. You can find the UUIDs of devices with the 'blkid' command:
blkid /dev/sda1
Various Troubleshooting
If you encounter trouble getting your SSH connections to work, especially when using tunneling through the proxy server, a very useful command to run is:
netstat -an
You may want to pipe the result of this command into less so you can look at the result easier (press 'q' to exit):
netstat -an | less
The results of running this command will look something like this:
Active Internet connections (servers and established)
Proto Recv-Q Send-Q Local Address           Foreign Address         State
tcp        0      0 0.0.0.0:22              0.0.0.0:*               LISTEN
tcp        0     88 123.123.123.123:22      124.124.124.124:52032   ESTABLISHED
tcp6       0      0 :::22                   :::*                    LISTEN
Active UNIX domain sockets (servers and established)
...
The example output above is what it looks like when I am SSH'ed into one of my servers. Pay special attention to the port numbers and states of each of the connections. In the above output, we can see that the first entry is 'tcp' (aka IPV4 TCP) and is listening for new connections from packets that have a destination port of 22, and are destined for any interface (0.0.0.0:22). Furthermore, we are listening for connections from any IP with any source port.
In the second entry, we see that there is an ESTABLISHED from my laptop which has IP 124.124.124.124 originating from port 52032 on my laptop (124.124.124.124:52032). This connection is sending packets to the server at 123.123.123.123 to port 22 (no surprise because that's the port for SSH connections).
In the third entry we see another listen socket for 'tcp6' which just means it is also listening for IPV6 connections too. In the above output, there are not remote forwarded tunnels set up, and you'll see more entries when there are. It may take you a while to get used to reading this output, but eventually you'll be able to glance at it and tell what is connected, what's waiting for connections, and what is unrelated.
Another thing you should do if you're having troubling setting up your SSH connection is use verbose mode when invoking SSH itself. You can enable full verbose mode with the '-vvv-' flag:
ssh -vvv pi-backup
Here is an example of the kind of output you might see:
robert@computer:~$ ssh -vvv pi-backup
openSSH-10.3 Ubuntu-ubuntu0.4, OpenSSL 1.1.3e  21 Nov 2009
debug1: Reading configuration data /home/robert/.ssh/config
debug1: /home/robert/.ssh/config line 3: Applying options for pi-backup
debug1: Reading configuration data /etc/ssh/ssh_config
debug1: /etc/ssh/ssh_config line 11: Applying options for *
...
Depending on what your problem is, you may be able to glean some useful information from the output that can help solve your problem.
Conclusion
In this article we've discussed many topics related to hosting a backup solution using your Raspberry Pi or spare laptop. This includes simple situations that only require communication with a Raspberry Pi hosted on the same LAN, but also more complex situations that require the connection to go over the internet. Concerns like flash memory corruption were discussed with the conclusion that you should avoid buying the absolute rock bottom cheapest flash memory, and also make sure you use a good power supply. A method of automating the backup 'push' operation was discussed that involves using cron jobs.
 A Guide to Recording 660FPS Video On A $6 Raspberry Pi Camera
Published 2019-08-01 |
 Buy Now -> |
 An Overview of How to Do Everything with Raspberry Pi Cameras
Published 2019-05-28 |
 Using SSH to Connect to Your Raspberry Pi Over The Internet
Published 2019-04-22 |
 DS18B20 Raspberry Pi Setup - What's The Deal With That Pullup Resistor?
Published 2019-06-12 |
 A Beginners Guide to Securing A Raspberry Pi
Published 2019-04-22 |
 Pump Room Leak & Temperature Monitoring With Raspberry Pi
Published 2019-06-20 |
 A Surprisingly Common Mistake Involving Wildcards & The Find Command
Published 2020-01-21 |
| Join My Mailing List Privacy Policy |
Why Bother Subscribing?
|